Difference between revisions of "Component: Switch (Slide, PCB) ()"
| Line 20: | Line 20: | ||
==Detailed description== | ==Detailed description== | ||
| + | |||
| + | |||
''No detailed description exists yet for this component'' | ''No detailed description exists yet for this component'' | ||
==Examples== | ==Examples== | ||
| + | |||
| + | |||
Here is an example Flowcode program to read the value of a switch. | Here is an example Flowcode program to read the value of a switch. | ||
| Line 59: | Line 63: | ||
|- | |- | ||
|- | |- | ||
| − | | width="10%" align="center" style="background-color:# | + | | width="10%" align="center" style="background-color:#EAE1EA;" | [[File:Fc9-conn-icon.png]] |
| − | | width="90%" style="background-color:# | + | | width="90%" style="background-color:#EAE1EA; color:#4B008D;" | Connections |
|- | |- | ||
|- | |- | ||
| Line 78: | Line 82: | ||
| colspan="2" | Time in milliseconds allowed for the chip pin to stabilise following a change of state. NB) Debouncing is only used when reading the switch state using the component macros. Chip pin is NOT debounced. | | colspan="2" | Time in milliseconds allowed for the chip pin to stabilise following a change of state. NB) Debouncing is only used when reading the switch state using the component macros. Chip pin is NOT debounced. | ||
|- | |- | ||
| − | | width="10%" align="center" style="background-color:# | + | | width="10%" align="center" style="background-color:#EAE1EA;" | [[File:Fc9-conn-icon.png]] |
| − | | width="90%" style="background-color:# | + | | width="90%" style="background-color:#EAE1EA; color:#4B008D;" | Simulation |
|- | |- | ||
|- | |- | ||
Latest revision as of 17:28, 9 November 2022
| Author | Matrix Ltd |
| Version | 1.2 |
| Category |
Contents
Switch (Slide, PCB) component
Subminiature slide switch with black tang, PCB mount.
Component Pack
FREE
Detailed description
No detailed description exists yet for this component
Examples
Here is an example Flowcode program to read the value of a switch.
![]() Switch
Switch
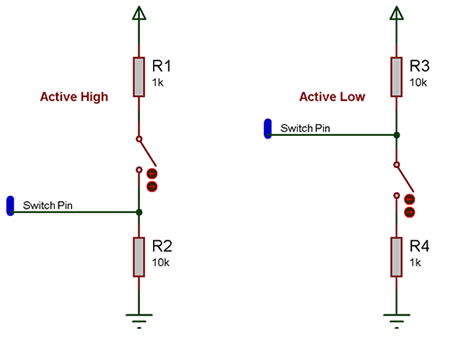
Here is a schematic of how to connect a basic switch to a microcontroller pin.
The active high circuit will pass a logical 0 to the input pin when the switch is not pressed and a logical 1 when the switch is pressed.
The active low circuit will pass a logical 1 to the input pin when the switch is not pressed and a logical 0 when the switch is pressed.
There are some differences depending on the type of switch you have, the above states assume a generic push to make type switch, however a push to break type switch would have reversed logic and a toggle switch can work well with either setup.
The resistors are required for correct operation because when a microcontroller's input pin is essentially connected to nothing it will pick up noise in the environment and provide inconsistent readings. This state is referred to as floating i.e. the pin is floating. To test this remove the resistors (if possible) and touch the unconnected pin with your finger the output LED from the example file above will toggle on and off at high speed.
Any values of resistor can be used but it is important to keep the smaller resistor at least 10X smaller then the larger resistor to ensure that the pressed state provides at least 0.91% of the required pressed state voltage. For example a active high switch circuit using 1K and 10K resistors should pull up to about 4.54V when the switch is pressed.
(5V / 11K) * 10K = 4.54545V
