Difference between revisions of "Raspberry Pi MQTT Broker"
| Line 34: | Line 34: | ||
hostname -I | hostname -I | ||
| + | |||
| + | Ideally you want to assign a static fixed IP address to the Raspberry Pi so it won't change dynamically at some point in the future. | ||
| + | |||
| + | To do this is quite simple, you can do it using the GUI in desktop mode or you can do it via SSH command as shown here. | ||
| + | |||
| + | https://www.ionos.co.uk/digitalguide/server/configuration/provide-raspberry-pi-with-a-static-ip-address/ | ||
Revision as of 10:17, 16 October 2020
Contents
Introduction
This page details how to get started with MQTT by installing a MQTT broker onto your Raspberry Pi or other Linux based machine.
This gives you a good starting point for creating personal IoT driven data such as smart homes, sensor networks and other smart connected devices.
Initial Setup
Raspbery Pi running Noobs or Raspbian Linux.
To install the Mosquitto Broker enter these next commands:
sudo apt update
sudo apt install -y mosquitto mosquitto-clients
You may have to type Y and press Enter to confirm the installation.
To make Mosquitto auto start on boot up enter:
mosquitto -v
This returns the Mosquitto version that is currently running in your Raspberry Pi. It should be 1.4.X or above.
Raspberry Pi IP Address
To use Mosquitto broker later on your projects, you’ll need your Raspberry Pi IP address. To retrieve your Raspberry Pi IP address, type the next command in your Terminal window:
hostname -I
Ideally you want to assign a static fixed IP address to the Raspberry Pi so it won't change dynamically at some point in the future.
To do this is quite simple, you can do it using the GUI in desktop mode or you can do it via SSH command as shown here.
Testing the Broker
Ubuntu 16.04 has a fairly recent version of Mosquitto in its default software repository. Log in with your non-root user and install Mosquitto with apt-get.
sudo apt-get install mosquitto mosquitto-clients
By default, Ubuntu will start the Mosquitto service after install. Let’s test the default configuration. We’ll use one of the Mosquitto clients we just installed to subscribe to a topic on our broker.
Topics are labels that you publish messages to and subscribe to. They are arranged as a hierarchy, so you could have sensors/outside/temp and sensors/outside/humidity, for example. How you arrange topics is up to you and your needs. Throughout this tutorial we will use a simple test topic to test our configuration changes.
Log in to your server a second time, so you have two terminals side-by-side. In the new terminal, use mosquitto_sub to subscribe to the test topic:
mosquitto_sub -h localhost -t test
-h is used to specify the hostname of the MQTT server, and -t is the topic name. You’ll see no output after hitting ENTER because mosquitto_sub is waiting for messages to arrive. Switch back to your other terminal and publish a message:
mosquitto_pub -h localhost -t test -m "hello world"
The options for mosquitto_pub are the same as mosquitto_sub, though this time we use the additional -m option to specify our message. Hit ENTER, and you should see hello world pop up in the other terminal. You’ve sent your first MQTT message!
Enter CTRL+C in the second terminal to exit out of mosquitto_sub, but keep the connection to the server open. We’ll use it again for another test in Step 5.
Securing the Broker with a Username and Password
Let’s configure Mosquitto to use passwords. Mosquitto includes a utility to generate a special password file called mosquitto_passwd. This command will prompt you to enter a password for the specified username, and place the results in /etc/mosquitto/passwd.
sudo mosquitto_passwd -c /etc/mosquitto/passwd sammy
Now we’ll open up a new configuration file for Mosquitto and tell it to use this password file to require logins for all connections:
sudo nano /etc/mosquitto/conf.d/default.conf
This should open an empty file. Paste in the following:
/etc/mosquitto/conf.d/default.conf
allow_anonymous false password_file /etc/mosquitto/passwd
allow_anonymous false will disable all non-authenticated connections, and the password_file line tells Mosquitto where to look for user and password information. Save and exit the file.
Now we need to restart Mosquitto and test our changes.
sudo systemctl restart mosquitto
Try to publish a message without a password:
mosquitto_pub -h localhost -t "test" -m "hello world"
The message should be rejected:
Output Connection Refused: not authorised. Error: The connection was refused.
Before we try again with the password, switch to your second terminal window again, and subscribe to the ‘test’ topic, using the username and password this time:
mosquitto_sub -h localhost -t test -u "sammy" -P "password"
It should connect and sit, waiting for messages. You can leave this terminal open and connected for the rest of the tutorial, as we’ll periodically send it test messages.
Now publish a message with your other terminal, again using the username and password:
mosquitto_pub -h localhost -t "test" -m "hello world" -u "sammy" -P "password"
The message should go through as in Step 1. We’ve successfully added password protection to Mosquitto. Unfortunately, we’re sending passwords unencrypted over the internet. We’ll fix that next by adding SSL encryption to Mosquitto.
Connecting using Flowcode
We have some examples using Flowcode available on this page.
Local Network and Internet Connectivity
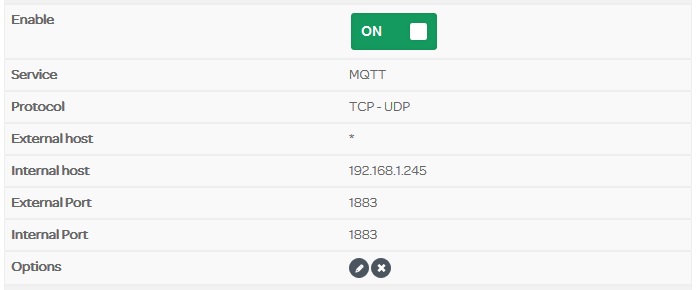
So far we have been communicating with the broker on a local area network. To make the broker available to the internet we have to expose the MQTT port to the internet. The easiest way to do this is to configure your router to port forward the MQTT communications port (Default 1833) to your local IP address.
Here my broker has an IP address of 192.168.1.245 and I have configured forwarding for port 1833 by logging into my internet router.
Guides for various models of routers are available from here.
https://portforward.com/router.htm
To connect to the broker from your local network you would use the local IP address as normal, for me that's 192.168.1.245.
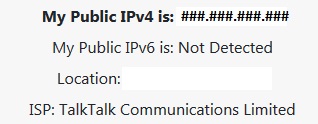
To connect to the broker from the internet, external to your local network then you would use your routers IP address. To find this you can simply visit whatismyip.com from within your local network.
Encrypting the Broker
So far everything we have been sending and receiving has been plain text and unencrypted. If you need your system to be more secure then encryption is a good step in the right direction.
Encryption won't work with every piece of hardware and so you need to be careful when implementing it to make sure everything that needs to get access will be able to.
Targets such as the Raspberry PI and ESP32 microcontroller should be able to deal with encryption with no problems.
This website shows a method to add you own signed certificate to your mosquitto MQTT broker.

