|
|
| (5 intermediate revisions by the same user not shown) |
| Line 17: |
Line 17: |
| ==Component Source Code== | | ==Component Source Code== |
|
| |
|
| Please click here to download the component source project: [https://www.flowcode.co.uk/wikicopy/componentsource/FC_Comp_Source_LED_charlieplex.fcfx FC_Comp_Source_LED_charlieplex.fcfx] | | Please click here to download the component source project: [https://www.flowcode.co.uk/wiki/componentsource/FC_Comp_Source_LED_charlieplex.fcfx FC_Comp_Source_LED_charlieplex.fcfx] |
|
| |
|
| Please click here to view the component source code (Beta): [https://www.flowcode.co.uk/FlowchartView/?wfile=componentsource/FC_Comp_Source_LED_charlieplex.fcfx FC_Comp_Source_LED_charlieplex.fcfx] | | Please click here to view the component source code (Beta): [https://www.flowcode.co.uk/FlowchartView/?wfile=componentsource/FC_Comp_Source_LED_charlieplex.fcfx FC_Comp_Source_LED_charlieplex.fcfx] |
|
| |
|
| ==Detailed description== | | ==Detailed description== |
| | |
| | |
| | |
| | |
|
| |
|
|
| |
|
| Line 46: |
Line 50: |
|
| |
|
| ==Examples== | | ==Examples== |
| | |
| | |
| | |
| | |
|
| |
|
|
| |
|
| Line 102: |
Line 110: |
| [[File:cp_4.jpg]] | | [[File:cp_4.jpg]] |
|
| |
|
| ==Macro reference==
| |
|
| |
|
| {| class="wikitable" style="width:60%; background-color:#FFFFFF;"
| |
| |-
| |
| | width="10%" align="center" style="background-color:#D8C9D8;" align="center" | [[File:Fc9-comp-macro.png]]
| |
| | width="90%" style="background-color:#D8C9D8; color:#4B008D;" | '''LEDOn'''
| |
| |-
| |
| | colspan="2" | Turn on the selected LED
| |
| |-
| |
| |-
| |
| | width="10%" align="center" | [[File:Fc9-u8-icon.png]] - BYTE
| |
| | width="90%" | Index
| |
| |-
| |
| | colspan="2" | Index of the LED to turn on starting from 1.
| |
| |-
| |
| | width="10%" align="center" style="border-top: 2px solid #000;" | [[File:Fc9-void-icon.png]] - VOID
| |
| | width="90%" style="border-top: 2px solid #000;" | ''Return''
| |
| |}
| |
|
| |
|
|
| |
|
| {| class="wikitable" style="width:60%; background-color:#FFFFFF;"
| |
| |-
| |
| | width="10%" align="center" style="background-color:#D8C9D8;" align="center" | [[File:Fc9-comp-macro.png]]
| |
| | width="90%" style="background-color:#D8C9D8; color:#4B008D;" | '''GetHandle'''
| |
| |-
| |
| | colspan="2" | Retrieves the object handle of the indexed clone. Returns zero for out of range indexes.
| |
| |-
| |
| |-
| |
| | width="10%" align="center" | [[File:Fc9-u8-icon.png]] - BYTE
| |
| | width="90%" | Index
| |
| |-
| |
| | colspan="2" |
| |
| |-
| |
| | width="10%" align="center" style="border-top: 2px solid #000;" | [[File:Fc9-h32-icon.png]] - HANDLE
| |
| | width="90%" style="border-top: 2px solid #000;" | ''Return''
| |
| |}
| |
|
| |
|
|
| |
|
| {| class="wikitable" style="width:60%; background-color:#FFFFFF;"
| |
| |-
| |
| | width="10%" align="center" style="background-color:#D8C9D8;" align="center" | [[File:Fc9-comp-macro.png]]
| |
| | width="90%" style="background-color:#D8C9D8; color:#4B008D;" | '''AllOff'''
| |
| |-
| |
| | colspan="2" | Turns off all elements
| |
| |-
| |
| |-
| |
| | width="10%" align="center" style="border-top: 2px solid #000;" | [[File:Fc9-void-icon.png]] - VOID
| |
| | width="90%" style="border-top: 2px solid #000;" | ''Return''
| |
| |}
| |
|
| |
|
|
| |
|
|
| |
|
|
| |
|
| ==Property reference==
| |
|
| |
|
| {| class="wikitable" style="width:60%; background-color:#FFFFFF;"
| | ==Macro reference== |
| |-
| |
| | width="10%" align="center" style="background-color:#D8C9D8;" | [[File:Fc9-prop-icon.png]]
| |
| | width="90%" style="background-color:#D8C9D8; color:#4B008D;" | '''Properties'''
| |
| |-
| |
| |-
| |
| | width="10%" align="center" style="background-color:#EAE1EA;" | [[File:Fc9-conn-icon.png]]
| |
| | width="90%" style="background-color:#EAE1EA; color:#4B008D;" | Connections
| |
| |-
| |
| |-
| |
| | width="10%" align="center" | [[File:Fc9-type-16-icon.png]]
| |
| | width="90%" | Pin Count
| |
| |-
| |
| | colspan="2" | The number of pins to dedicate to the charlieplexed output.
| |
| |-
| |
| | width="10%" align="center" | [[File:Fc9-type-21-icon.png]]
| |
| | width="90%" | LED Count
| |
| |-
| |
| | colspan="2" | The maximum number of LEDs that can be individually addressed based on the number of pins available.
| |
| |-
| |
| | width="10%" align="center" | [[File:Fc9-type-5-icon.png]]
| |
| | width="90%" | Pin 0
| |
| |-
| |
| | colspan="2" | Chip pin connection for charlieplexed signal 0
| |
| |-
| |
| | width="10%" align="center" | [[File:Fc9-type-5-icon.png]]
| |
| | width="90%" | Pin 1
| |
| |-
| |
| | colspan="2" | Chip pin connection for charlieplexed signal 1
| |
| |-
| |
| | width="10%" align="center" | [[File:Fc9-type-5-icon.png]]
| |
| | width="90%" | Pin 2
| |
| |-
| |
| | colspan="2" | Chip pin connection for charlieplexed signal 2
| |
| |-
| |
| | width="10%" align="center" style="background-color:#EAE1EA;" | [[File:Fc9-conn-icon.png]]
| |
| | width="90%" style="background-color:#EAE1EA; color:#4B008D;" | Simulation
| |
| |-
| |
| |-
| |
| | width="10%" align="center" | [[File:Fc9-type-16-icon.png]]
| |
| | width="90%" | Alignment
| |
| |-
| |
| | colspan="2" | Which 3D axis to align the copies along.
| |
| |-
| |
| | width="10%" align="center" | [[File:Fc9-type-15-icon.png]]
| |
| | width="90%" | Spacing
| |
| |-
| |
| | colspan="2" | The distance between LEDs in the array. LEDs will be spaced symmetrically around the component centre. Use a negative value to reverse the order of the LEDs.
| |
| |-
| |
| | width="10%" align="center" | [[File:Fc9-type-15-icon.png]]
| |
| | width="90%" | Width
| |
| |-
| |
| | colspan="2" | Width of the LED shape.
| |
| |-
| |
| | width="10%" align="center" | [[File:Fc9-type-15-icon.png]]
| |
| | width="90%" | Height
| |
| |-
| |
| | colspan="2" | Height of the LED shape.
| |
| |-
| |
| | width="10%" align="center" | [[File:Fc9-type-7-icon.png]]
| |
| | width="90%" | Reverse
| |
| |-
| |
| | colspan="2" | Reverse the direction of the LEDs.
| |
| |-
| |
| | width="10%" align="center" | [[File:Fc9-type-12-icon.png]]
| |
| | width="90%" | Type
| |
| |-
| |
| | colspan="2" | Type of shape
| |
| |-
| |
| | width="10%" align="center" style="background-color:#EAE1EA;" | [[File:Fc9-conn-icon.png]]
| |
| | width="90%" style="background-color:#EAE1EA; color:#4B008D;" | Colors
| |
| |-
| |
| |-
| |
| | width="10%" align="center" style="background-color:#EAE1EA;" | [[File:Fc9-conn-icon.png]]
| |
| | width="90%" style="background-color:#EAE1EA; color:#4B008D;" | Label
| |
| |-
| |
| |-
| |
| | width="10%" align="center" | [[File:Fc9-type-16-icon.png]]
| |
| | width="90%" | Show
| |
| |-
| |
| | colspan="2" | Decide what labels to show... None - no labels are displayed Name - shows each component's name Property - shows a particular property of each component (see 'property' below.
| |
| |-
| |
| | width="10%" align="center" | [[File:Fc9-type-1-icon.png]]
| |
| | width="90%" | Color
| |
| |-
| |
| | colspan="2" | Color of the labels text.
| |
| |-
| |
| | width="10%" align="center" | [[File:Fc9-type-15-icon.png]]
| |
| | width="90%" | Scale
| |
| |-
| |
| | colspan="2" | Sets the basic size (text height) of the labels.
| |
| |-
| |
| | width="10%" align="center" | [[File:Fc9-type-7-icon.png]]
| |
| | width="90%" | Follow Zoom
| |
| |-
| |
| | colspan="2" | Whether labels get bigger and smaller when the panel is zoomed in and out.
| |
| |-
| |
| | width="10%" align="center" | [[File:Fc9-type-16-icon.png]]
| |
| | width="90%" | Position
| |
| |-
| |
| | colspan="2" | Set the position of the label relative to the component.
| |
| |}==Macro reference==
| |
|
| |
|
| | ===AllOff=== |
| {| class="wikitable" style="width:60%; background-color:#FFFFFF;" | | {| class="wikitable" style="width:60%; background-color:#FFFFFF;" |
| |- | | |- |
| | width="10%" align="center" style="background-color:#D8C9D8;" align="center" | [[File:Fc9-comp-macro.png]] | | | width="10%" align="center" style="background-color:#D8C9D8;" align="center" | [[File:Fc9-comp-macro.png]] |
| | width="90%" style="background-color:#D8C9D8; color:#4B008D;" | '''LEDOn''' | | | width="90%" style="background-color:#D8C9D8; color:#4B008D;" | '''AllOff''' |
| |-
| |
| | colspan="2" | Turn on the selected LED
| |
| |- | | |- |
| | | colspan="2" | Turns off all elements |
| |- | | |- |
| | width="10%" align="center" | [[File:Fc9-u8-icon.png]] - BYTE
| |
| | width="90%" | Index
| |
| |-
| |
| | colspan="2" | Index of the LED to turn on starting from 1.
| |
| |- | | |- |
| | width="10%" align="center" style="border-top: 2px solid #000;" | [[File:Fc9-void-icon.png]] - VOID | | | width="10%" align="center" style="border-top: 2px solid #000;" | [[File:Fc9-void-icon.png]] - VOID |
| Line 278: |
Line 136: |
|
| |
|
|
| |
|
| | ===GetHandle=== |
| {| class="wikitable" style="width:60%; background-color:#FFFFFF;" | | {| class="wikitable" style="width:60%; background-color:#FFFFFF;" |
| |- | | |- |
| Line 296: |
Line 155: |
|
| |
|
|
| |
|
| {| class="wikitable" style="width:60%; background-color:#FFFFFF;"
| | ===LEDOn=== |
| |-
| |
| | width="10%" align="center" style="background-color:#D8C9D8;" align="center" | [[File:Fc9-comp-macro.png]]
| |
| | width="90%" style="background-color:#D8C9D8; color:#4B008D;" | '''AllOff'''
| |
| |-
| |
| | colspan="2" | Turns off all elements
| |
| |-
| |
| |-
| |
| | width="10%" align="center" style="border-top: 2px solid #000;" | [[File:Fc9-void-icon.png]] - VOID
| |
| | width="90%" style="border-top: 2px solid #000;" | ''Return''
| |
| |}
| |
| | |
| | |
| | |
| | |
| ==Property reference==
| |
| | |
| {| class="wikitable" style="width:60%; background-color:#FFFFFF;"
| |
| |-
| |
| | width="10%" align="center" style="background-color:#D8C9D8;" | [[File:Fc9-prop-icon.png]]
| |
| | width="90%" style="background-color:#D8C9D8; color:#4B008D;" | '''Properties'''
| |
| |-
| |
| |-
| |
| | width="10%" align="center" style="background-color:#EAE1EA;" | [[File:Fc9-conn-icon.png]]
| |
| | width="90%" style="background-color:#EAE1EA; color:#4B008D;" | Connections
| |
| |-
| |
| |-
| |
| | width="10%" align="center" | [[File:Fc9-type-16-icon.png]]
| |
| | width="90%" | Pin Count
| |
| |-
| |
| | colspan="2" | The number of pins to dedicate to the charlieplexed output.
| |
| |-
| |
| | width="10%" align="center" | [[File:Fc9-type-21-icon.png]]
| |
| | width="90%" | LED Count
| |
| |-
| |
| | colspan="2" | The maximum number of LEDs that can be individually addressed based on the number of pins available.
| |
| |-
| |
| | width="10%" align="center" | [[File:Fc9-type-5-icon.png]]
| |
| | width="90%" | Pin 0
| |
| |-
| |
| | colspan="2" | Chip pin connection for charlieplexed signal 0
| |
| |-
| |
| | width="10%" align="center" | [[File:Fc9-type-5-icon.png]]
| |
| | width="90%" | Pin 1
| |
| |-
| |
| | colspan="2" | Chip pin connection for charlieplexed signal 1
| |
| |-
| |
| | width="10%" align="center" | [[File:Fc9-type-5-icon.png]]
| |
| | width="90%" | Pin 2
| |
| |-
| |
| | colspan="2" | Chip pin connection for charlieplexed signal 2
| |
| |-
| |
| | width="10%" align="center" style="background-color:#EAE1EA;" | [[File:Fc9-conn-icon.png]]
| |
| | width="90%" style="background-color:#EAE1EA; color:#4B008D;" | Simulation
| |
| |-
| |
| |-
| |
| | width="10%" align="center" | [[File:Fc9-type-16-icon.png]]
| |
| | width="90%" | Alignment
| |
| |-
| |
| | colspan="2" | Which 3D axis to align the copies along.
| |
| |-
| |
| | width="10%" align="center" | [[File:Fc9-type-15-icon.png]]
| |
| | width="90%" | Spacing
| |
| |-
| |
| | colspan="2" | The distance between LEDs in the array. LEDs will be spaced symmetrically around the component centre. Use a negative value to reverse the order of the LEDs.
| |
| |-
| |
| | width="10%" align="center" | [[File:Fc9-type-15-icon.png]]
| |
| | width="90%" | Width
| |
| |-
| |
| | colspan="2" | Width of the LED shape.
| |
| |-
| |
| | width="10%" align="center" | [[File:Fc9-type-15-icon.png]]
| |
| | width="90%" | Height
| |
| |-
| |
| | colspan="2" | Height of the LED shape.
| |
| |-
| |
| | width="10%" align="center" | [[File:Fc9-type-7-icon.png]]
| |
| | width="90%" | Reverse
| |
| |-
| |
| | colspan="2" | Reverse the direction of the LEDs.
| |
| |-
| |
| | width="10%" align="center" | [[File:Fc9-type-12-icon.png]]
| |
| | width="90%" | Type
| |
| |-
| |
| | colspan="2" | Type of shape
| |
| |-
| |
| | width="10%" align="center" style="background-color:#EAE1EA;" | [[File:Fc9-conn-icon.png]]
| |
| | width="90%" style="background-color:#EAE1EA; color:#4B008D;" | Colors
| |
| |-
| |
| |-
| |
| | width="10%" align="center" style="background-color:#EAE1EA;" | [[File:Fc9-conn-icon.png]]
| |
| | width="90%" style="background-color:#EAE1EA; color:#4B008D;" | Label
| |
| |-
| |
| |-
| |
| | width="10%" align="center" | [[File:Fc9-type-16-icon.png]]
| |
| | width="90%" | Show
| |
| |-
| |
| | colspan="2" | Decide what labels to show... None - no labels are displayed Name - shows each component's name Property - shows a particular property of each component (see 'property' below.
| |
| |-
| |
| | width="10%" align="center" | [[File:Fc9-type-1-icon.png]]
| |
| | width="90%" | Color
| |
| |-
| |
| | colspan="2" | Color of the labels text.
| |
| |-
| |
| | width="10%" align="center" | [[File:Fc9-type-15-icon.png]]
| |
| | width="90%" | Scale
| |
| |-
| |
| | colspan="2" | Sets the basic size (text height) of the labels.
| |
| |-
| |
| | width="10%" align="center" | [[File:Fc9-type-7-icon.png]]
| |
| | width="90%" | Follow Zoom
| |
| |-
| |
| | colspan="2" | Whether labels get bigger and smaller when the panel is zoomed in and out.
| |
| |-
| |
| | width="10%" align="center" | [[File:Fc9-type-16-icon.png]]
| |
| | width="90%" | Position
| |
| |-
| |
| | colspan="2" | Set the position of the label relative to the component.
| |
| |}==Macro reference==
| |
| | |
| {| class="wikitable" style="width:60%; background-color:#FFFFFF;" | | {| class="wikitable" style="width:60%; background-color:#FFFFFF;" |
| |- | | |- |
| Line 432: |
Line 172: |
| | width="90%" style="border-top: 2px solid #000;" | ''Return'' | | | width="90%" style="border-top: 2px solid #000;" | ''Return'' |
| |} | | |} |
|
| |
|
| |
| {| class="wikitable" style="width:60%; background-color:#FFFFFF;"
| |
| |-
| |
| | width="10%" align="center" style="background-color:#D8C9D8;" align="center" | [[File:Fc9-comp-macro.png]]
| |
| | width="90%" style="background-color:#D8C9D8; color:#4B008D;" | '''GetHandle'''
| |
| |-
| |
| | colspan="2" | Retrieves the object handle of the indexed clone. Returns zero for out of range indexes.
| |
| |-
| |
| |-
| |
| | width="10%" align="center" | [[File:Fc9-u8-icon.png]] - BYTE
| |
| | width="90%" | Index
| |
| |-
| |
| | colspan="2" |
| |
| |-
| |
| | width="10%" align="center" style="border-top: 2px solid #000;" | [[File:Fc9-h32-icon.png]] - HANDLE
| |
| | width="90%" style="border-top: 2px solid #000;" | ''Return''
| |
| |}
| |
|
| |
|
| |
| {| class="wikitable" style="width:60%; background-color:#FFFFFF;"
| |
| |-
| |
| | width="10%" align="center" style="background-color:#D8C9D8;" align="center" | [[File:Fc9-comp-macro.png]]
| |
| | width="90%" style="background-color:#D8C9D8; color:#4B008D;" | '''AllOff'''
| |
| |-
| |
| | colspan="2" | Turns off all elements
| |
| |-
| |
| |-
| |
| | width="10%" align="center" style="border-top: 2px solid #000;" | [[File:Fc9-void-icon.png]] - VOID
| |
| | width="90%" style="border-top: 2px solid #000;" | ''Return''
| |
| |}
| |
|
| |
|
| |
|
| |
|
|
| |
|
| Author
|
Matrix Ltd.
|
| Version
|
1.5
|
| Category
|
LEDs
|
LED Charlieplex component
Create an evenly spaced array of LED indicators using a reduced amount of I/O pins. Only one LED can be switched on at once, high speed multiplexing allows multiple LEDs to appear to be lit at once. Each will be connected in line with the standard charlieplex scheme. Set target object to point at any standard LED component to change the style.
Component Source Code
Please click here to download the component source project: FC_Comp_Source_LED_charlieplex.fcfx
Please click here to view the component source code (Beta): FC_Comp_Source_LED_charlieplex.fcfx
Detailed description
No detailed description exists yet for this component
Examples
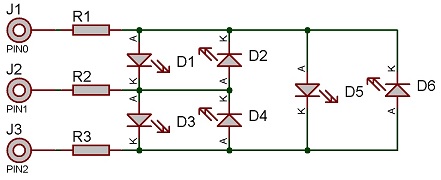
The Charlieplex scheme simply places two LEDs between each combination of two microcontroller control pins. One LED in forward bias the the other LED in reverse bias.
With two control pins you can control up to two LEDs or a single bicolour LED.
With three control pins you can control up to six LEDs or up to three bicolour LEDs.
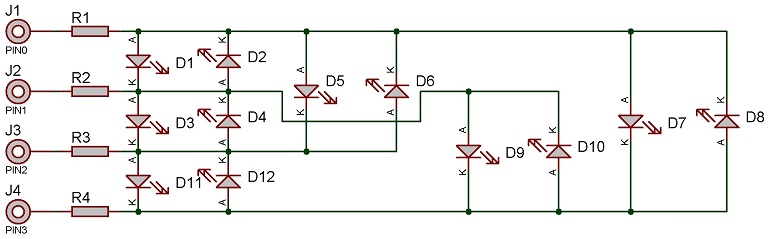
With four control pins you can control up to twelve LEDs or up to six bicolour LEDs.
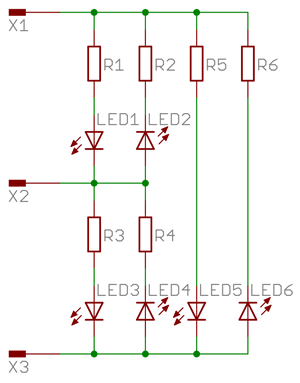
If all the LEDs you want to drive have the same characteristics then you can wire up like this to use the same current limiting resistors to drive multiple LEDs.
If the LEDs you want to drive have different characteristics then you can wire up like this to use different current limiting resistors for each individual LED.
The value of resistor used can be changed based on the brightness of the LED and power consumption.
This LED Calculator tool is a good resource for calculating the correct LED series protection resistor.
LED Resistor Calculator Tool
Here is an example of a 4-pin setup.
Macro reference
AllOff

|
AllOff
|
| Turns off all elements
|
 - VOID - VOID
|
Return
|
GetHandle
|
|
GetHandle
|
| Retrieves the object handle of the indexed clone. Returns zero for out of range indexes.
|
 - BYTE - BYTE
|
Index
|
|
|
 - HANDLE - HANDLE
|
Return
|
LEDOn
|
|
LEDOn
|
| Turn on the selected LED
|
| - BYTE
|
Index
|
| Index of the LED to turn on starting from 1.
|
| - VOID
|
Return
|
Property reference

|
Properties
|

|
Connections
|

|
Pin Count
|
| The number of pins to dedicate to the charlieplexed output.
|

|
LED Count
|
| The maximum number of LEDs that can be individually addressed based on the number of pins available.
|

|
Pin 0
|
| Chip pin connection for charlieplexed signal 0
|
|
|
Pin 1
|
| Chip pin connection for charlieplexed signal 1
|
|
|
Pin 2
|
| Chip pin connection for charlieplexed signal 2
|
|
|
Simulation
|
|
|
Alignment
|
| Which 3D axis to align the copies along.
|

|
Spacing
|
| The distance between LEDs in the array. LEDs will be spaced symmetrically around the component centre. Use a negative value to reverse the order of the LEDs.
|
|
|
Width
|
| Width of the LED shape.
|
|
|
Height
|
| Height of the LED shape.
|

|
Reverse
|
| Reverse the direction of the LEDs.
|

|
Type
|
| Type of shape
|
|
|
Colors
|
|
|
Label
|
|
|
Show
|
| Decide what labels to show... None - no labels are displayed Name - shows each component's name Property - shows a particular property of each component (see 'property' below.
|

|
Color
|
| Color of the labels text.
|
|
|
Scale
|
| Sets the basic size (text height) of the labels.
|
|
|
Follow Zoom
|
| Whether labels get bigger and smaller when the panel is zoomed in and out.
|
|
|
Position
|
| Set the position of the label relative to the component.
|


