Difference between revisions of "Customising A Component"
| (3 intermediate revisions by 2 users not shown) | |||
| Line 2: | Line 2: | ||
Sometimes components may need to be customised, for example with specific default pin connections that are meaningful for your hardware. | Sometimes components may need to be customised, for example with specific default pin connections that are meaningful for your hardware. | ||
| − | |||
| − | |||
| Line 10: | Line 8: | ||
Begin by starting a new project and select the microcontroller you are going to be using. | Begin by starting a new project and select the microcontroller you are going to be using. | ||
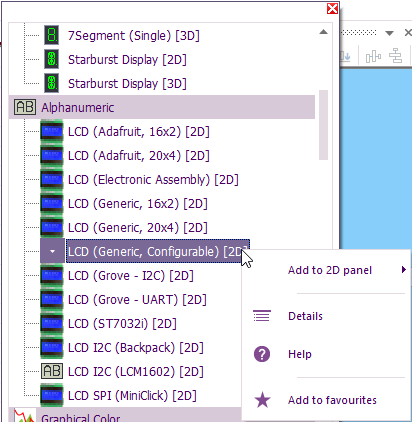
| − | Next add the component you wish to customise to | + | Next add the component you wish to customise to the apropreate panel e.g 2D for 2D components. I am using the generic customable LCD which I want to assign with custom pre-set pins on PortD. |
[[File:CAC1.jpg]] | [[File:CAC1.jpg]] | ||
| Line 18: | Line 16: | ||
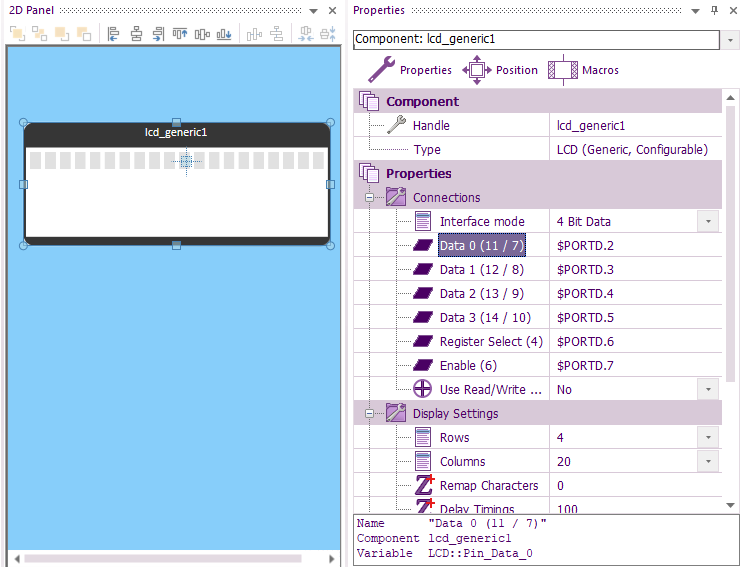
Select the component on the panel and open the Properties window. Then adjust the properties to be as you want them to be. For example I'm going to change the pins from the default PortB 0-5 to PortD 2 - 7. | Select the component on the panel and open the Properties window. Then adjust the properties to be as you want them to be. For example I'm going to change the pins from the default PortB 0-5 to PortD 2 - 7. | ||
| + | |||
| + | Tip: You can change the top pin then Right or left click and select '''Auto connect digital''' | ||
[[File:CAC2.jpg]] | [[File:CAC2.jpg]] | ||
| Line 49: | Line 49: | ||
| − | Next click on the File -> | + | Next click on the '''File''' -> '''Export''' -> '''Edit the export settings for your component''' |
===Setup Tab - Standard=== | ===Setup Tab - Standard=== | ||
| − | Give the component a Name, a Cosmetic Name, Assign a Category from the drop down menu. | + | Give the component a Name, a Cosmetic Name, Assign pannel type, Assign a Category from the drop down menu. |
[[File:CAC7.jpg]] | [[File:CAC7.jpg]] | ||
| Line 69: | Line 69: | ||
==Exporting the component== | ==Exporting the component== | ||
| − | Next simply click the File -> Export | + | Next simply click the '''File''' -> '''Export''' -> '''Export this project as a component''' to save the component as a .fcpx file. This file can be saved into the standard Flowcode components folder or you can create your own custom folder. |
| + | You might be prompted to save the project fcfx file first if there have been any changes. | ||
===Flowcode 7=== | ===Flowcode 7=== | ||
| Line 85: | Line 86: | ||
Export directly into the Components folder by copying and pasting the path into the filename field and hitting return. | Export directly into the Components folder by copying and pasting the path into the filename field and hitting return. | ||
| + | ===Flowcode 9=== | ||
| + | |||
| + | Components location : "C:\ProgramData\MatrixTSL\FlowcodeV9\Components" | ||
| + | |||
| + | Export directly into the Components folder by copying and pasting the path into the filename field and hitting return. | ||
| + | |||
| + | ===Flowcode 10=== | ||
| + | |||
| + | Components location : "C:\ProgramData\MatrixTSL\FlowcodeV10\Components" | ||
| + | |||
| + | Export directly into the Components folder by copying and pasting the path into the filename field and hitting return. | ||
===Custom Location=== | ===Custom Location=== | ||
| Line 90: | Line 102: | ||
Export directly to your own custom components folder. | Export directly to your own custom components folder. | ||
| − | To use your own folder simply click on | + | To use your own folder simply click on '''File''' -> Global Settings -> Locations Tab menu and add your custom folder location to the Look for components in... text field. |
[[File:CAC8.jpg]] | [[File:CAC8.jpg]] | ||
| Line 100: | Line 112: | ||
[[File:CAC9.jpg]] | [[File:CAC9.jpg]] | ||
| + | |||
| + | |||
| + | ==Advanced - Dynamic Properties== | ||
| + | |||
| + | Note: Some component properties such as CAL type component channels and pins are dynamic and based on the selected target microcontroller and will not work with the method explained above, for these you will have to use something like the Initialise event and the Simulation API to force your custom property values in as the component is loaded. | ||
Latest revision as of 10:59, 31 October 2023
Contents
Introduction
Sometimes components may need to be customised, for example with specific default pin connections that are meaningful for your hardware.
Adding the component
Begin by starting a new project and select the microcontroller you are going to be using.
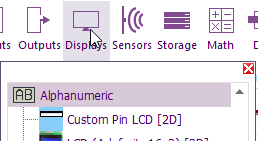
Next add the component you wish to customise to the apropreate panel e.g 2D for 2D components. I am using the generic customable LCD which I want to assign with custom pre-set pins on PortD.
Presetting Property Values
Select the component on the panel and open the Properties window. Then adjust the properties to be as you want them to be. For example I'm going to change the pins from the default PortB 0-5 to PortD 2 - 7.
Tip: You can change the top pin then Right or left click and select Auto connect digital
Exposing Properties
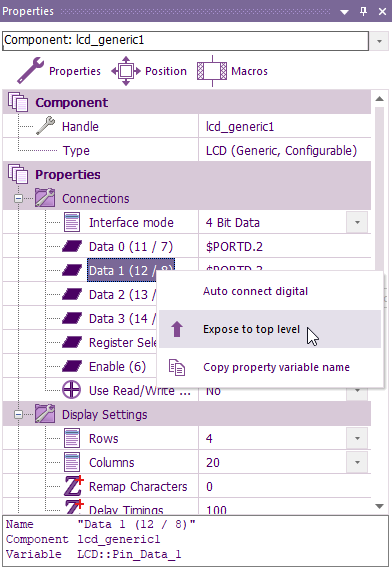
While we are in the properties window there may be properties that you will still need to be available to the user when using your new customised component. Simply right click these properties and choose Expose from the menu to expose these properties to the user of the component.
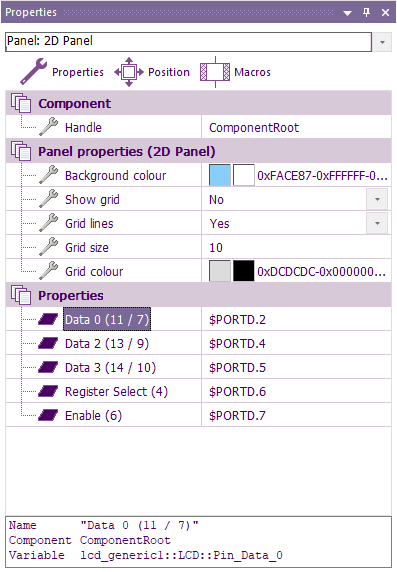
You can see which properties will be available to the user by clicking on a blank area of the component panel, or by choosing Panel from the drop down menu at the top of the Properties window.
Exposing Macros
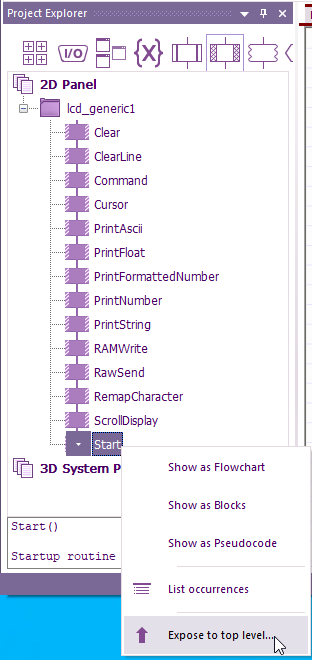
As well as properties you will also need to expose the macros for the component that can be called. This could be all the components macros or could simply be a sub set if you only ever use a few macro calls from a component. Open the Project Explorer window and select the components tab, then right click any macros you want available and select Expose from the menu.
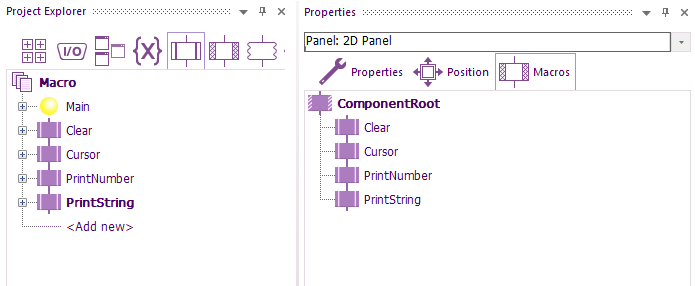
You can see which macros will be available to the user by clicking on a blank area of the component panel, or by choosing Panel from the drop down menu at the top of the Properties window and then selecting the Macros tab.
Finishing Up
Before we export the component we need to do a number of small finishing steps to get the new component ready. First save your project in a meaningful location with a meaningful name so you can go back and re-export the modified component in future if needed.
Next click on the File -> Export -> Edit the export settings for your component
Setup Tab - Standard
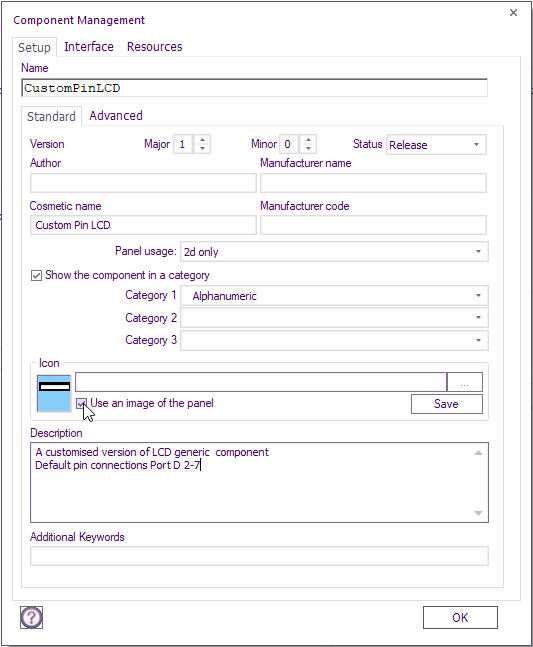
Give the component a Name, a Cosmetic Name, Assign pannel type, Assign a Category from the drop down menu.
Setup Tab - Advanced
If you have already created one component from your project file and want to create a new but different component then click Edit next to GUID and click New next to the GUID, this ensures you do not overwrite your previously exported component.
When you're done click OK.
Exporting the component
Next simply click the File -> Export -> Export this project as a component to save the component as a .fcpx file. This file can be saved into the standard Flowcode components folder or you can create your own custom folder.
You might be prompted to save the project fcfx file first if there have been any changes.
Flowcode 7
Components location : "C:\Program Files (x86)\Flowcode 7\Components"
Export somewhere with write access e.g. your desktop and then manually copy the file into the components folder using Windows explorer, you will need administrator permissions to write inside the Program Files (x86) folder.
Flowcode 8
Components location : "C:\ProgramData\MatrixTSL\FlowcodeV8\Components"
Export directly into the Components folder by copying and pasting the path into the filename field and hitting return.
Flowcode 9
Components location : "C:\ProgramData\MatrixTSL\FlowcodeV9\Components"
Export directly into the Components folder by copying and pasting the path into the filename field and hitting return.
Flowcode 10
Components location : "C:\ProgramData\MatrixTSL\FlowcodeV10\Components"
Export directly into the Components folder by copying and pasting the path into the filename field and hitting return.
Custom Location
Export directly to your own custom components folder.
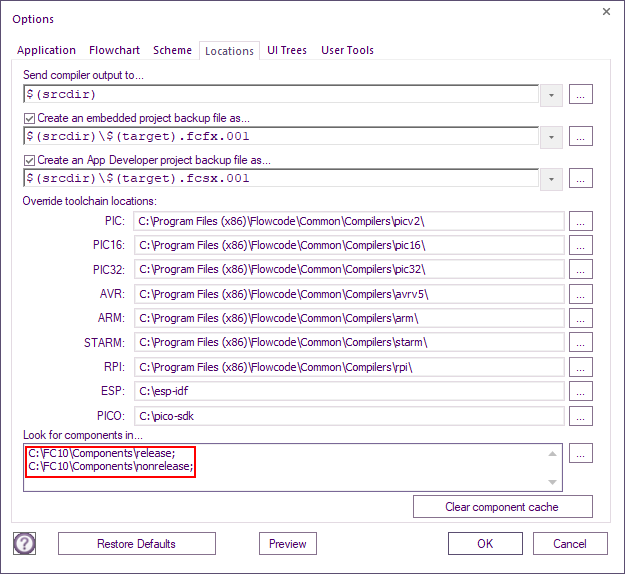
To use your own folder simply click on File -> Global Settings -> Locations Tab menu and add your custom folder location to the Look for components in... text field.
Using the component
The new component should now appear in Flowcode in the category you selected. Simply use the component as you would any other component.
Advanced - Dynamic Properties
Note: Some component properties such as CAL type component channels and pins are dynamic and based on the selected target microcontroller and will not work with the method explained above, for these you will have to use something like the Initialise event and the Simulation API to force your custom property values in as the component is loaded.
