Component: CAPTOUCH (CAL)
| Author | Matrix Ltd |
| Version | 1.0 |
| Category | CAL |
Contents
CAPTOUCH component
A low level implementation giving direct access to the CAL
Component Source Code
Please click here to download the component source project: FC_Comp_Source_temp/CAPTOUCH.fcfx
Please click here to view the component source code (Beta): FC_Comp_Source_temp/CAPTOUCH.fcfx
Detailed description
No detailed description exists yet for this component
Examples
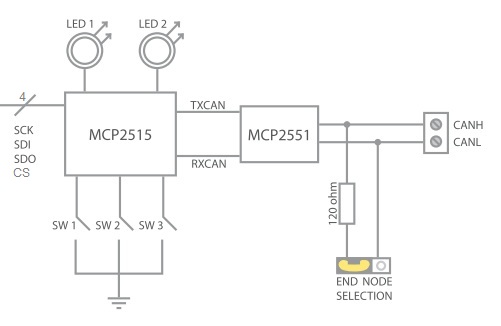
Internal CAN schematic
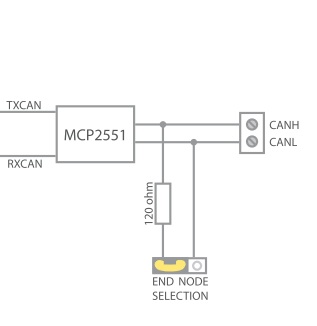
External CAN schematic
CAN Message Decoding
The CAN component works together with the injector component to allow you to decode a CAN message ID into a meaningful command.
Example File
![]() CAN_Example1
When a key on the keypad is pressed the CAN components transmits a CAN packet.
CAN_Example1
When a key on the keypad is pressed the CAN components transmits a CAN packet.
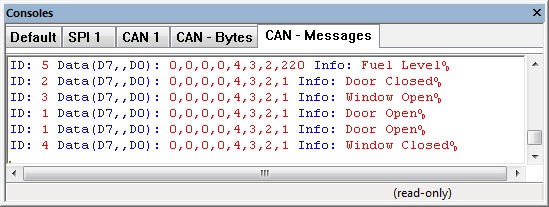
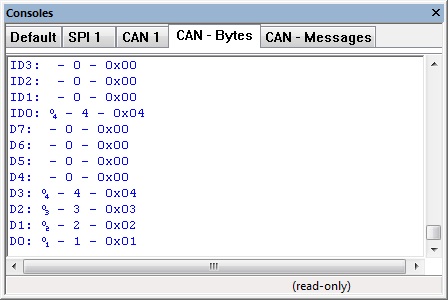
The CAN packet is decoded by the injector component to give us a meaningful log on the console window.
High Level CAN Data Console
Low Level CAN Data Console
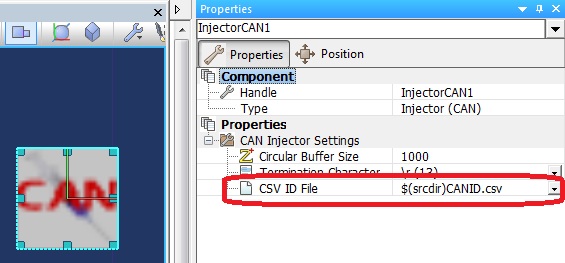
Reference from CAN Injector to ID decode file, $(srcdir) refers to the current project directory.
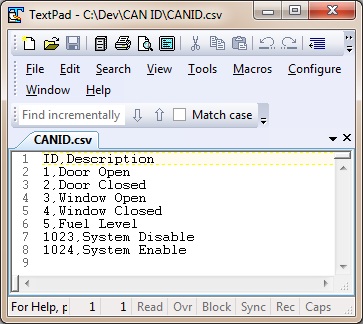
Demo CAN ID file File:CANID.csv
CAN Masks and Filters
How to work out which messages will be trapped by a particular mask/filter combination
Note that all values for message id's, masks and filters are numbers between 0x000 and 0x7FF.
Example 1
Mask0 = 0x0FF
Filter0 = 0x100
Filter1 = 0x050
In binary, this looks like:
Mask0 = 000 1111 1111
Filter0 = 001 0000 0000
Filter1 = 000 0101 0000
For the mask, a "1" signifies "check this bit" and a "0" means "ignore this bit"
So, these filters will accept the following messages ("x" = don't care)
Filter0 = xxx 0000 0000
Filter1 = xxx 0101 0000
i.e.
Filter0 = 0x000, 0x100, 0x200, 0x300, 0x400, 0x500, 0x600, 0x700
Filter1 = 0x050, 0x150, 0x250, 0x350, 0x450, 0x550, 0x650, 0x750
Example 2
Mask1 = 0x350
Filter2 = 0x200
Filter3 = 0x123
Filter4 = 0x3FF
Rewriting in binary:
Mask1 = 111 0101 0000
Filter2 = 010 0000 0000
Filter3 = 001 0010 0011
Filter4 = 111 1111 1111
Here, the mask will only check 4 bits and ignore the other 6. Here's what the filters will accept:
Filter2 = 010 x0x0 xxxx
Filter3 = 001 x0x0 xxxx
Filter4 = 111 x1x1 xxxx
They will actually trap a lot of messages (64 each!):
Filter2 = 0x200, 0x201, 0x202, ... 0x220, 0x221, ... 0x280, 0x281, ... 0x2A0, 0x2A1, ... 0x2AF
Filter3 = 0x100, 0x101, 0x102, ... 0x120, 0x121, ... 0x180, 0x181, ... 0x1A0, 0x1A1, ... 0x1AF
Filter4 = 0x750, 0x751, 0x752, ... 0x770, 0x771, ... 0x7D0, 0x7D1, ... 0x7F0, 0x7F1, ... 0x7FF
This second example is not very practical. In general, it is more logical to set the mask so that each filter accepts a consecutive range of messages.
As you can see, the mask determines which bits of the filters are actually looked at. Setting the mask to 0x000 will effectively mean that the filter will accept any incoming message. Also, the value of the mask directly relates to how many messages each filter will trap - i.e. 2^(number of '0' bits in the mask).
A useful way to use the mask would be to ignore the least significant bits. Lets say that you wanted the filters to accept 16 messages each - setting the Mask0 to 0x7F0 would achieve this. Then, setting the filters to the following:
Filter0 = 0x100
Filter1 = 0x110
would mean that the following messages are accepted:
Filter0 = 0x100, 0x101, 0x102, 0x103, 0x104, ... 0x10D, 0x10E, 0x10F
Filter1 = 0x110, 0x111, 0x112, 0x113, 0x114, ... 0x11D, 0x11E, 0x11F
Of course, for simple CAN applications you may wish to only accept one or two messages. Setting the mask to 0x7FF in this instance would mean that only the message ID specified by each filter would be accepted, e.g.
Mask1 = 0x7FF
Filter2 = 0x100
Filter5 = 0x200
This would mean that only messages 0x100 and 0x200 would be accepted into buffer 1.
Macro reference
Charge
| Charge | |
| End drain and begin charging the circuit | |
| [[File:]] - | Return |
Drain
| Drain | |
| Drain charge on the circuit | |
| [[File:]] - | Return |
Init
| Init | |
| Initialise | |
| [[File:]] - | Return |
Reset
| Reset | |
| Reset, set status bits to zero | |
| [[File:]] - | Return |
Stop
| Stop | |
| Stop charging circuit | |
| [[File:]] - | Return |
Property reference
| Properties |
