Using PC Developer APIs to Control an Arduino
Introduction
App Developer is an Integrated Development Environment (IDE) for creating Windows-based applications. The software is capable of controlling slave ECIO28/40, Arduino, and ESP32 devices live. It achieves this by using flowcharts instead of text-based languages, thus making controlling simpler and faster.
There is no need to compile and download your program after making changes like you would with an embedded controller.
Since Slave devices are driven in real-time, the changes are instant. App Developer also contains over 120 pre-made component libraries, allowing users to interface slave devices with a host of sensors, inputs and outputs and electro-mechanical components with ease. Despite its simplicity and ease of use, App Developer is a powerful tool allowing users to develop even the most complex of remote hardware interfaces.
What we’ll cover in this guide?
Required firmware for each slave device
Set up app developer for a cleaner workspace.
Changing the colour of the 2D panel.
Set an output on D3 of the Arduino Uno, depending on the2D panel switch setting.
Read and display an analogue input value.
Light an indicator if the input goes above 2.5V.
What is required?
Flowcode V10
Indication of 5V, e.g. 330R – 680R Resistor and LED or multimeter.
Potentiometer 4k7 – 10KΩ
This guide will provide step-by-step instructions on how to develop your first App
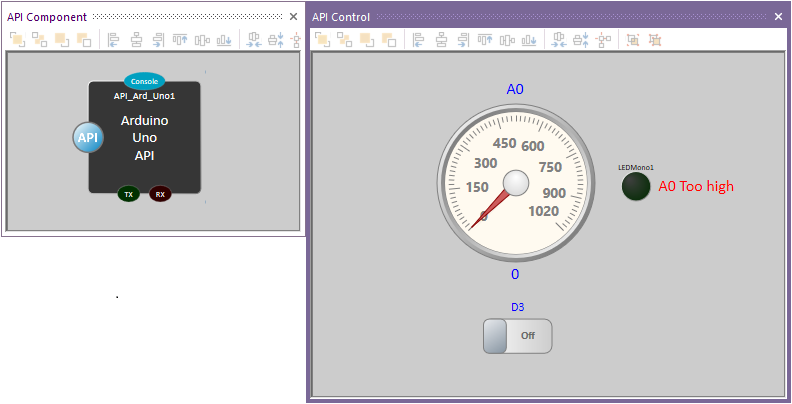
The finished results will look something like this:
First, make sure the slave device, e.g., Arduino UNO, is connected to a PC.
The slave hardware requires the correct slave firmware loaded into it before the App Developer can communicate with the slave device.
Within the wiki search box, search for SCADA Slaves.
Find the slave you will be using, e.g. Component: SCADA (Arduino Uno) (SCADA Slaves)
Select the link and download the SCADA Firmware.
The zip file will contain three files:
I loaded Arduino_Uno_SCADA_Firmware.fcfx file and then compiled to the target device.
If this firmware is not loaded on the slave hardware, UNO, then the APP Developer will not work.
After opening Flowcode, select new project, then select App Developer tab.
Expand API arrow then SCADA slave.
Choose the slave device, in this case, Arduino Uno SCADA Slave.
Select New < Arduino Uno SCADA Slave> App Developer Project.
Select File, Save, then a Save As window will open.
As with other windows applications, browse to where you want to save the project and give it a suitable name.
Make sure Flowcode is fully up-to-date.
Help Ribbon (Tab). Library Updates…
Change Files in-use to Full database, select Yes for the warning, then Download
If Flowcode Requires restarting, You can select Reload![]()
Setting an output.
The pin mapping for the Arduino is:
D0 or D1 will not be touched, as the App developer uses them for slave control.
We will connect a basic simulation switch to change digital output D3, which goes to a resistor 330R – 680R.
The Anode of LED connects to the other end of the resistor.
Cathode of LED connects to GND
Analogue A0 is the input to monitor, which goes to the centre pin of a potentiometer.
The other two ends of the potentiometer connect to 5V and GND connections
Ensure the 2D Panel (View Ribbon, 2D Dashboard panel) is in view as all the applications will be more than likely developed using it.
Move the already added UNO Scada component out of the way.
To do that, make sure the position icon (a square with four arrows) is selected.


