Difference between revisions of "Global Settings"
| (15 intermediate revisions by the same user not shown) | |||
| Line 17: | Line 17: | ||
| − | ==Application | + | ==Application== |
| − | |||
| − | + | [[File:Global_sett_opts_Application.png]] | |
| + | |||
| + | ===Override Language=== | ||
Allows the user to override the default Flowcode language settings and to display Flowcode in the specified language. | Allows the user to override the default Flowcode language settings and to display Flowcode in the specified language. | ||
| Line 41: | Line 42: | ||
Displays a popup at the end of simulation which displays the duration of the simulation as well as other technical information. | Displays a popup at the end of simulation which displays the duration of the simulation as well as other technical information. | ||
| − | [[File: | + | [[File:Simulation_end_Popup.png]] |
| − | |||
| Line 48: | Line 48: | ||
Automatically opens the [[Icon Properties]] when adding a new icon. | Automatically opens the [[Icon Properties]] when adding a new icon. | ||
| − | |||
| Line 91: | Line 90: | ||
| − | ===Check for core updates on launch | + | ===Check for core updates on launch=== |
| + | |||
| + | Checks for any new versions of Flowcode and shows | ||
| − | + | [[File:Core_update_available.png]] | |
| − | |||
| − | + | for a few seconds if any are found. | |
| − | |||
| − | |||
| − | === | + | You will need to click on the '''Core update available''' text for the upgrade to start. |
| + | |||
| + | |||
| + | ===Enable background checking for library updates=== | ||
| + | When you add a component that has a later version available a pop-up will show | ||
| + | |||
| + | [[File:Component_update_available.png]] for a few seconds. | ||
| + | You will need to click on the '''Updates Available''' text for the upgrade to start. | ||
| Line 109: | Line 114: | ||
| + | ==Flowchart== | ||
| − | |||
| − | [[File: | + | [[File:Global_sett_flowch.png]] |
===Font name=== | ===Font name=== | ||
| Line 122: | Line 127: | ||
Allows users to set the default font size used by Flowcode | Allows users to set the default font size used by Flowcode | ||
| − | |||
| − | |||
| − | |||
| − | |||
| − | |||
| − | |||
| − | |||
| − | |||
| − | |||
| − | |||
| Line 144: | Line 139: | ||
| − | |||
| − | + | ===Show descriptions for icons=== | |
| − | + | Shows the description at the top of each icon. | |
| + | E.g. Delay, Calculation & Component Macro, etc. | ||
| − | |||
| − | === | + | ===Show text inside icons=== |
| + | |||
| + | Shows the text inside the icons | ||
| + | |||
| − | + | ===Show annotations=== | |
| − | + | Shows the text to the right of the icons | |
| − | + | ===Limit description size for all icons=== | |
| − | + | Limits the description text to 18 characters. | |
| − | |||
| + | ===Limit annotation size for new icons=== | ||
| + | Limits the text to the right of all new icons to 19 characters. | ||
| + | ===Anotation style=== | ||
| + | allows the look of the annotation to the right of each new icon to be changed. | ||
| + | E.g. C Code will add '''//''' at the start etc. | ||
| + | ===Icon graphics style=== | ||
| + | This menu allows users to select a different graphics style for the entire project, selecting a graphics style will alter the look of the flowchart view mode. | ||
| + | ===Source graphics style=== | ||
| + | This menu allows users to select a different graphics style for the source view mode. | ||
| − | |||
| − | + | ==Scheme== | |
| − | + | [[File:Global_sett_scheme.png]] | |
| − | + | ===Scheme=== | |
| + | This menu allows users to select a colour scheme for the flowchart icons. Users can also choose their own colour schemes and save them. | ||
| − | === | + | ===Background=== |
| − | + | Users can manually select the colour scheme, including foreground pattern, for the flowchart area. Users can also select the selection' and 'execution' colours. | |
| + | ===Icon=== | ||
| − | + | Here users can manually change the colour of icons to suit their requirements. | |
| − | + | ==Locations== | |
| + | [[File:Global_sett_locations.png]] | ||
| − | === | + | ===Send compiler output to=== |
| − | + | This option decides the default target directory to output to when compiling. | |
| − | === | + | ===Create an embedded project backup file as === |
| − | + | Allows a backup embedded project file to be created based on the previous save of the file. If you need to go back then simply rename the file using Windows explorer and change the filetype from .001 to .fcfx. | |
| − | === | + | ===Create an App Developer project backup file as === |
| − | + | Allows a backup App developer project file to be created based on the previous save of the file. If you need to go back then simply rename the file using Windows explorer and change the filetype from .001 to .fcsx. | |
| − | + | ===Override toolchain locations=== | |
| − | + | The toolchain locations Flowcode will use. | |
| + | All except ESP and PICO will be entered automatically after installing the appropriate toolchain | ||
| − | |||
| + | ===Look for components in=== | ||
| − | + | This option allows you to include additional directories for Flowcode to search when looking for components. | |
| + | If you have more than one different directory with the same component. | ||
| + | The component with the latest date/time will be loaded | ||
| − | |||
| − | |||
| − | + | ==UI Trees== | |
| − | + | [[File:Global_sett_UI_Trees.png]] | |
| − | |||
| + | This allows you to completely customise '''[[Using_the_Project_Explorer|Project Explorer]] and Icon Lists with any of the available tabs. | ||
| − | == | + | ==User Tools== |
| − | [[File: | + | [[File:Global_sett_User_Tools.png]] |
| − | + | User Tools allows a user to run external programs or batch files from Flowcode. They will appear on the Build menu: | |
| − | [[File: | + | [[File:User_Tools.png]] |
| + | Typical uses will be to execute common external tools that you use during development, for example to integrate with version control software | ||
| − | + | To create a tool, click the Build >> “Customise…” button or open '''[[Global_Settings|Global Settings]]''' and select the “User Tools” menu. | |
| − | + | [[File:User_Tools2.png]] | |
| + | Select New (Insert) button | ||
| − | + | [[File:User_Tools_New_Insert_icon.png]] | |
| − | + | Enter the required name for the new tool. | |
| + | If at a later stage, the name requires editing, just double-click on it. | ||
| − | + | Click on the tool name you just added so you can select the three dots to allow you to choose a file or a folder. | |
| − | + | For the Arguments, select the down arrow and chose from the list of arguments. | |
| + | [[File:User_Tools4.png]] | ||
| − | + | If $(outdir) is selected and there is a space within the directory, then it will need to be enclosed within speech marks. | |
| + | For example "$(outdir)" | ||
| − | + | Before selecting the next Argument, a space must be added after the last Argument. | |
| + | To run the tools, select Build ribbon then the name of the tool. | ||
| − | + | Here’s an example of running a batch file accessing some substitution arguments: | |
| − | + | [[File:User_Tools3.png]] | |
Latest revision as of 10:57, 19 September 2023
The Global Settings allow the user to set display options for Flowcode. You can access these settings by pressing 'File' then 'Global Settings...' at the bottom.
The options are split into tabs (sections) which each contain different options to allow you to change different aspects of Flowcode.
These options configure the program itself, from changes to appearance, customization of the program to the ability to personalize the program to your preference.
Other options available also allow control over web access and proxy settings as well as the ability to override the default language to display a different language.
You also have the ability to add directories and locations to search for components and directories to be used in Flowcode, you can also change the default directory of the compiler output location, you can do all this and more from within the Global Settings.
Contents
- 1 Application
- 1.1 Override Language
- 1.2 Use dashboard as default panel
- 1.3 Disable system panel
- 1.4 Show popup on simulation end
- 1.5 Auto-edit new icons
- 1.6 Autosave periodically
- 1.7 Add icons comments to C code
- 1.8 Allow errors in flowcharts
- 1.9 Allow unconnected ports and pins
- 1.10 Create separate .c and .h files
- 1.11 Web Access
- 1.12 Show help in external browser
- 1.13 Show forums in external browser
- 1.14 Check for core updates on launch
- 1.15 Enable background checking for library updates
- 1.16 Graphics Engine
- 2 Flowchart
- 2.1 Font name
- 2.2 Font size
- 2.3 Indent loop flowlines
- 2.4 Transparent background
- 2.5 Show descriptions for icons
- 2.6 Show text inside icons
- 2.7 Show annotations
- 2.8 Limit description size for all icons
- 2.9 Limit annotation size for new icons
- 2.10 Anotation style
- 2.11 Icon graphics style
- 2.12 Source graphics style
- 3 Scheme
- 4 Locations
- 5 UI Trees
- 6 User Tools
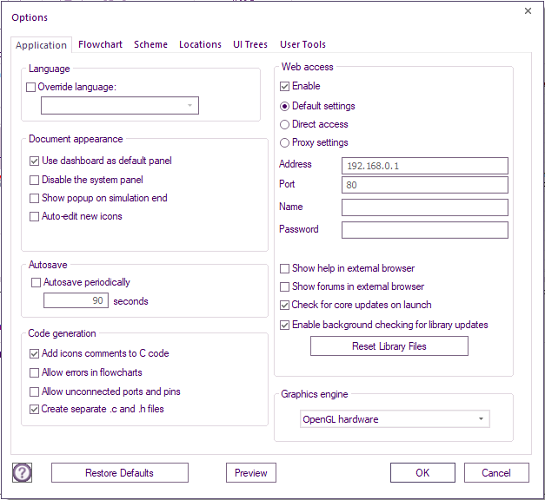
Application
Override Language
Allows the user to override the default Flowcode language settings and to display Flowcode in the specified language. Select the language from those available on the drop down list. Note: The relevant language packs need to be installed for Flowcode to enable that particular language.
Use dashboard as default panel
When checked, components are added to the dashboard panel by default, instead of the system panel.
Disable system panel
Disables the system panel completely, leaving the 2D panel to handle components and 2D graphics.
Show popup on simulation end
Displays a popup at the end of simulation which displays the duration of the simulation as well as other technical information.
Auto-edit new icons
Automatically opens the Icon Properties when adding a new icon.
Autosave periodically
Enables the autosave feature of Flowcode. This will create a backup file named the same as your project but with the .fcbx file suffix. You can set how often the autosave will work, the minimum setting is every 60 seconds.
Add icons comments to C code
Toggling this option will change whether icons include their associated C-code comments.
Allow errors in flowcharts
Allows you to edit icons without error messages, errors messages still occur when simulating and compiling the program.
Allow unconnected ports and pins
Allows you to change component connection properties to unconnected, error messages still occur when simulating and compiling the program.
Create separate .c and .h files
C code files are optionally saved as separate c/h files for incorporation into external projects
Web Access
Configures the settings to allow Flowcode to connect to the internet. Used for features like online activation and to drive the content in the start page and auto updates.
Show help in external browser
Opens wiki help pages in your default external browser
Show forums in external browser
Opens the forums main page in your default external browser
Check for core updates on launch
Checks for any new versions of Flowcode and shows
for a few seconds if any are found.
You will need to click on the Core update available text for the upgrade to start.
Enable background checking for library updates
When you add a component that has a later version available a pop-up will show
You will need to click on the Updates Available text for the upgrade to start.
Graphics Engine
Configures how we display objects on the simulation panels. Software mode is the default setting as it is more reliable for all users at the cost of being fairly slow. Hardware mode obviously is dependent on your specific 3D acceleration hardware meaning it may potentially have problems, if it does work ok with your hardware then it should be faster then the software mode.
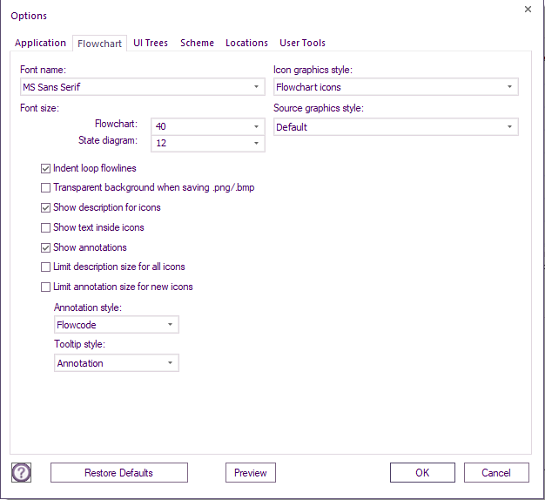
Flowchart
Font name
Allows users to set the font used by Flowcode
Font size
Allows users to set the default font size used by Flowcode
Indent loop flowlines
Allows the flowchart line to be indented when part of a loop to make it much more obvious what code is placed inside the braces of the loop icon.
Transparent background
Selecting this option will set all backgrounds to be fully transparent when saving any .png or .bmp files from flowcode, this will ignore any colors set as the background.
Show descriptions for icons
Shows the description at the top of each icon. E.g. Delay, Calculation & Component Macro, etc.
Show text inside icons
Shows the text inside the icons
Show annotations
Shows the text to the right of the icons
Limit description size for all icons
Limits the description text to 18 characters.
Limit annotation size for new icons
Limits the text to the right of all new icons to 19 characters.
Anotation style
allows the look of the annotation to the right of each new icon to be changed. E.g. C Code will add // at the start etc.
Icon graphics style
This menu allows users to select a different graphics style for the entire project, selecting a graphics style will alter the look of the flowchart view mode.
Source graphics style
This menu allows users to select a different graphics style for the source view mode.
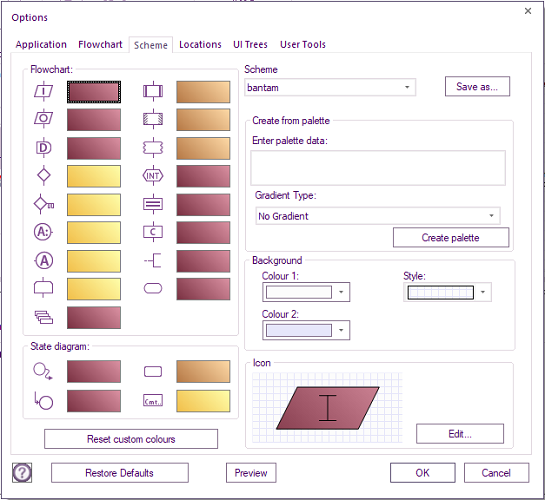
Scheme
Scheme
This menu allows users to select a colour scheme for the flowchart icons. Users can also choose their own colour schemes and save them.
Background
Users can manually select the colour scheme, including foreground pattern, for the flowchart area. Users can also select the selection' and 'execution' colours.
Icon
Here users can manually change the colour of icons to suit their requirements.
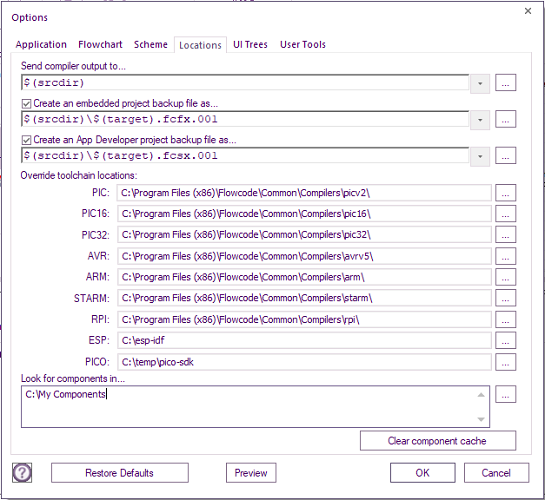
Locations
Send compiler output to
This option decides the default target directory to output to when compiling.
Create an embedded project backup file as
Allows a backup embedded project file to be created based on the previous save of the file. If you need to go back then simply rename the file using Windows explorer and change the filetype from .001 to .fcfx.
Create an App Developer project backup file as
Allows a backup App developer project file to be created based on the previous save of the file. If you need to go back then simply rename the file using Windows explorer and change the filetype from .001 to .fcsx.
Override toolchain locations
The toolchain locations Flowcode will use. All except ESP and PICO will be entered automatically after installing the appropriate toolchain
Look for components in
This option allows you to include additional directories for Flowcode to search when looking for components. If you have more than one different directory with the same component. The component with the latest date/time will be loaded
UI Trees
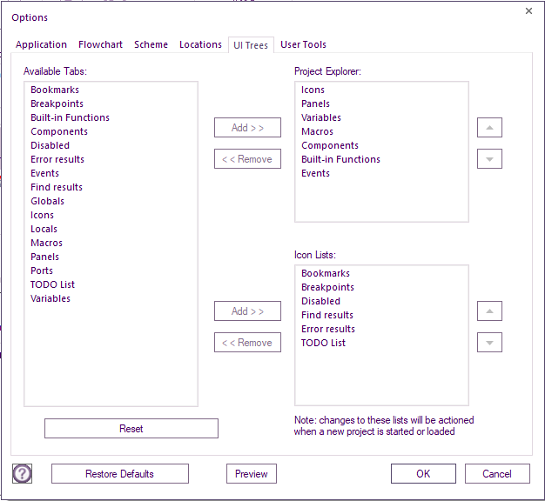
This allows you to completely customise Project Explorer and Icon Lists with any of the available tabs.
User Tools
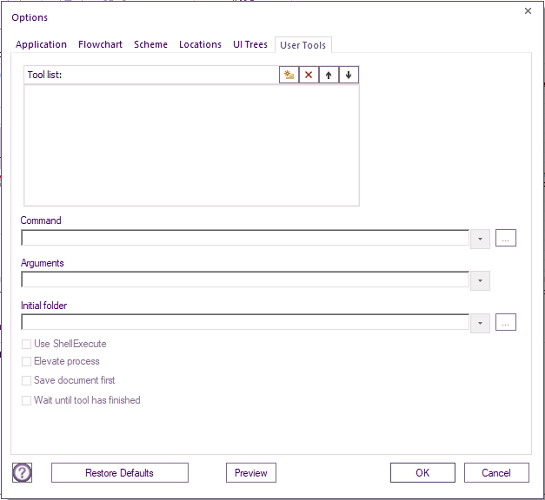
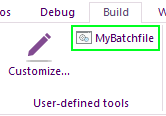
User Tools allows a user to run external programs or batch files from Flowcode. They will appear on the Build menu:
Typical uses will be to execute common external tools that you use during development, for example to integrate with version control software
To create a tool, click the Build >> “Customise…” button or open Global Settings and select the “User Tools” menu.
Select New (Insert) button
Enter the required name for the new tool.
If at a later stage, the name requires editing, just double-click on it.
Click on the tool name you just added so you can select the three dots to allow you to choose a file or a folder.
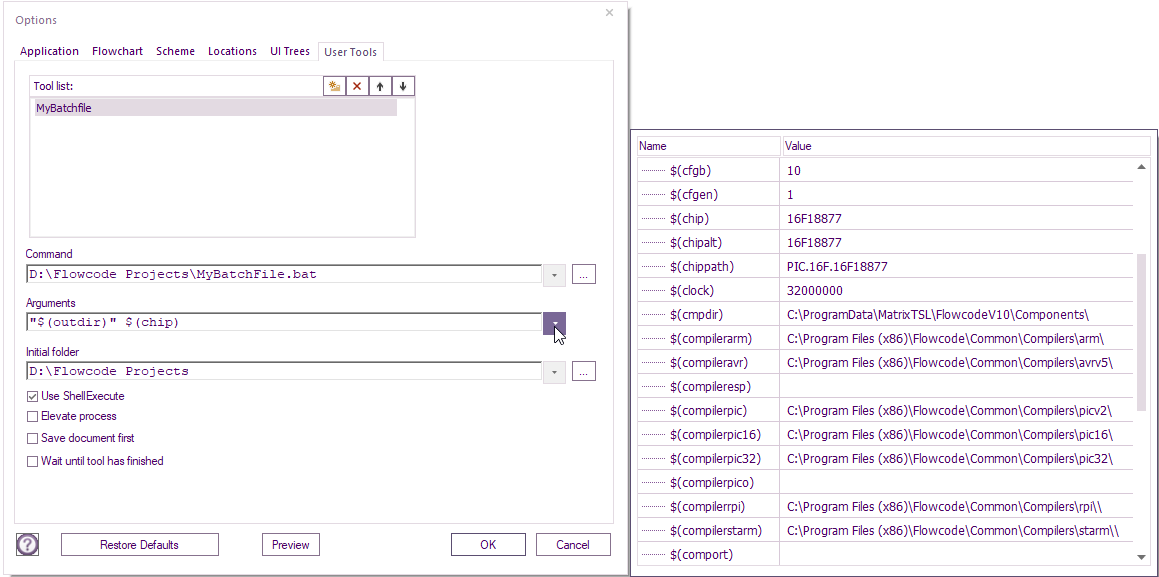
For the Arguments, select the down arrow and chose from the list of arguments.
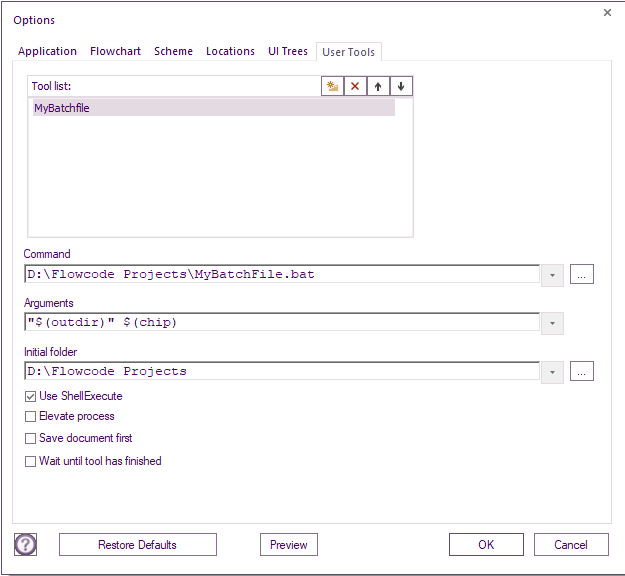
If $(outdir) is selected and there is a space within the directory, then it will need to be enclosed within speech marks. For example "$(outdir)"
Before selecting the next Argument, a space must be added after the last Argument.
To run the tools, select Build ribbon then the name of the tool.
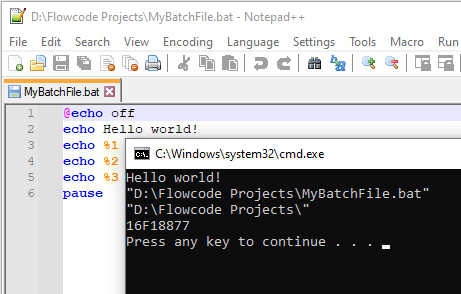
Here’s an example of running a batch file accessing some substitution arguments:

