Difference between revisions of "Exercise - Exporting the LED Component"
From Flowcode Help
Jump to navigationJump to searchJohnVerrill (talk | contribs) |
JohnVerrill (talk | contribs) |
||
| Line 1: | Line 1: | ||
==Preliminaries== | ==Preliminaries== | ||
| + | [[File:gen_exerciseLEDexport_compmansetup_01.png|300px|right]] | ||
* Create a LED component as shown in the [[Exercise - Create a LED component]]. | * Create a LED component as shown in the [[Exercise - Create a LED component]]. | ||
| − | |||
| Line 22: | Line 22: | ||
::* Set the 'LEDoff' and 'LEDon' macros as 'Component' macros, by selecting each in turn, and clicking on 'Component macro' in the 'Type of macro' drop-down menu. | ::* Set the 'LEDoff' and 'LEDon' macros as 'Component' macros, by selecting each in turn, and clicking on 'Component macro' in the 'Type of macro' drop-down menu. | ||
::* Set the 'PinChange' macro as a 'Hidden' macro, in the same way. | ::* Set the 'PinChange' macro as a 'Hidden' macro, in the same way. | ||
| − | :* In this case, there is no need to use the 'Resources' tab, as there are no additional files | + | :* In this case, there is no need to use the 'Resources' tab, as there are no additional files to save with the component. |
* Click on 'OK'. | * Click on 'OK'. | ||
| + | |||
| + | |||
| + | |||
==Saving the component== | ==Saving the component== | ||
| Line 32: | Line 35: | ||
* Click 'Save'. The component file is saved with a '*.fcpx' extension. | * Click 'Save'. The component file is saved with a '*.fcpx' extension. | ||
| + | |||
| + | |||
Revision as of 18:41, 26 May 2013
Preliminaries
- Create a LED component as shown in the Exercise - Create a LED component.
Declaring the interface
Before you export a component, you need to 'declare the interface'. The interface is the collection of macros and files publically available to the user. Declaring the interface means deciding which of the component routines to make available to the user, and to decide whether these are suitable for simulation or for download.
- Move the mouse cursor over the System Panel, and right-click.
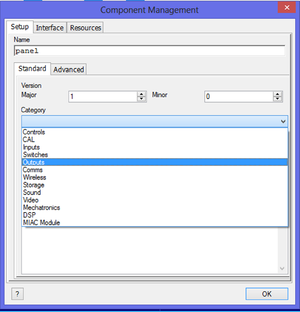
- Select the option 'Export component'. The Component Management dialogue box opens. This replicates the settings, Settings Manager, Interface Manager and Resources Manager available on the Panel Properties.
- Configure this for the LED component as follow:
- Click on the 'Setup' tab.
- Assign the component to a category, by clicking on the down-arrow next to the label 'Category'. In this case, the component will go into the 'Outputs' toolbox.
- Click on the check-box next to the 'Use an image of the panel' label.
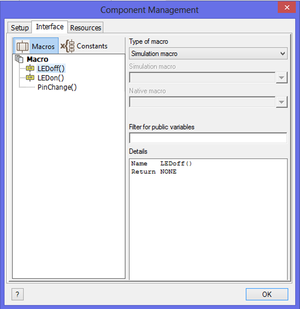
- Click on the 'Interface' tab.
- Set the 'LEDoff' and 'LEDon' macros as 'Component' macros, by selecting each in turn, and clicking on 'Component macro' in the 'Type of macro' drop-down menu.
- Set the 'PinChange' macro as a 'Hidden' macro, in the same way.
- In this case, there is no need to use the 'Resources' tab, as there are no additional files to save with the component.
- Click on 'OK'.
Saving the component
- You may be asked if you want to save the current flowchart. Do so if you wish.
- The 'Save As' dialogue box opens. This will automatically point to a destination Flowcode will search for components. Select a suitable name for the component.
- Click 'Save'. The component file is saved with a '*.fcpx' extension.
Testing the component
Select to create a new flowchart from the main menu.
Go to the category your component was assigned to be in. If you did not select a category you will find the component inMisc.
Drag your component onto a panel, or double click on it.
Create a test flowchart

