Difference between revisions of "Exercise - Importing and Testing the Traffic Cone"
From Flowcode Help
Jump to navigationJump to searchJohnVerrill (talk | contribs) |
JohnVerrill (talk | contribs) |
||
| Line 2: | Line 2: | ||
* Create a new flowchart. | * Create a new flowchart. | ||
| − | * The following assumes that you have built, and exported a | + | * The following assumes that you have built, and exported a traffic cone component, as described in [[Exercise - Create a LED component]] and [[Exercise - Exporting the LED component]]. |
* Open the 'Outputs' toolbox, where you stored the exported 'newLED' component. (If no destination was specified for the exported component, it would appear in the 'Misc' toolbox.) | * Open the 'Outputs' toolbox, where you stored the exported 'newLED' component. (If no destination was specified for the exported component, it would appear in the 'Misc' toolbox.) | ||
| Line 46: | Line 46: | ||
::* Drag and drop a second 'Delay' icon after the second 'Component macro' and configure it as you did the first. (Alternatively, click on the first icon, and 'copy and paste' it, and then move it to the correct position in the flowchart.) | ::* Drag and drop a second 'Delay' icon after the second 'Component macro' and configure it as you did the first. (Alternatively, click on the first icon, and 'copy and paste' it, and then move it to the correct position in the flowchart.) | ||
| + | |||
| + | * Your flowchart should now resemble the one shown below: | ||
| + | [[File:gen_exercisetest_LEDimport_testflowchart.png|200px|center]] | ||
| + | |||
| + | |||
| + | * Simulate the flowchart, (see [[Exercise - Simulate a simple flowchart]]), to test whether the import has worked. | ||
Revision as of 20:10, 27 May 2013
- Create a new flowchart.
- The following assumes that you have built, and exported a traffic cone component, as described in Exercise - Create a LED component and Exercise - Exporting the LED component.
- Open the 'Outputs' toolbox, where you stored the exported 'newLED' component. (If no destination was specified for the exported component, it would appear in the 'Misc' toolbox.)
- Locate the 'newLED' component, and use the down-arrow next to it to add it to the System Panel. It can now be used in the same way as any other electronic device.
- Create a flowchart which uses the imported component.
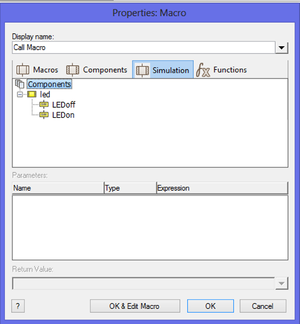
- Add a component macro to the flowchart, and double-click on it.
- Click on the 'Simulation' tab. The simulation macros, 'LEDoff' and 'LEDon',appear in the tree.
- Click on the one you want, and then click on 'OK'.
- Simulate the flowchart, (see Exercise - Simulate a simple flowchart), to test whether the import has worked.
- Create a new Flowcode flowchart.
- The following assumes that you have imported a LED component, as described in Exercise - Importing the LED component.
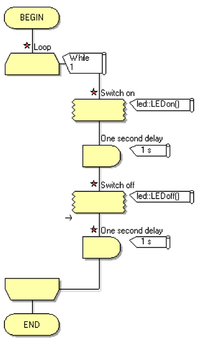
- Build the flowchart as follows:
- Open the 'Outputs' toolbox, where you stored the exported 'newLED' component.
- Locate the 'newLED' component, and use the down-arrow next to it to add it to the System Panel.
- Drag and drop a 'Loop' icon onto the flowchart. Leave it in its default state, to loop indefinitely.
- Drag and drop a 'Component macro' icon inside the loop.
- Double-click on it so that you can configure it.
- Click on the 'Simulation' tab to see the associated macros. You should see two, called 'LEDoff' and 'LEDon'.
- Click on the 'LEDon' macro. Change the 'Display name' to "Switch on" and click 'OK'.
- Drag and drop a 'Delay' icon to follow the 'Component macro'.
- Double-click on it, rename it "One second delay" and change the unit to 'seconds'.
- Drag and drop a second 'Component macro' to follow the one second delay.
- Double-click on it. Rename it "Switch off" and select the 'LEDoff' macro. Click on 'OK'.
- Drag and drop a second 'Delay' icon after the second 'Component macro' and configure it as you did the first. (Alternatively, click on the first icon, and 'copy and paste' it, and then move it to the correct position in the flowchart.)
- Your flowchart should now resemble the one shown below:
- Simulate the flowchart, (see Exercise - Simulate a simple flowchart), to test whether the import has worked.

