Raspberry Pi Getting Started Guide
Contents
Raspberry Pi as a Flowcode target
Raspberry Pi is an inexpensive board level target with digital I/O but also internet functionality built in. As such it provides an ideal base for diverse applications including IoT (the Internet of Things). For the first time, Flowcode 8 enables users to target this hugely popular Raspberry Pi family of boards. Flowcode is an intuitive way to program, either at home, in the classroom or for industrial uses.
Alongside this, our E-blocks2 hardware platform also supports the Raspberry Pi and the Raspberry Pi Shield is perfect for those who wish to integrate their Pi into the E-blocks system.
Flowcode is chip independent and the Raspberry Pi is just one target of 33 different families of microcontroller that we support. Hence most projects can easily be ported from one target device to any other.
There are many advantages to creating Flowcode applications on Raspberry Pi, here are just a few:
• The huge library of Flowcode components can be used
• Remote download of the Flowcode generated applications via WiFi or Ethernet
• The Flowcode generated programs run on the Raspbian Linux operating system
• Flowcode generated applications can be called up from other programs
• Multiple Flowcode applications can be run simultaneously on the Raspberry Pi
• Debug message capability directly from the Raspberry Pi to a console window on the PC
• When used in conjunction with the Matrix hardware the Ghost features of Flowcode are available
Using Raspberry Pi with Flowcode 10
SD cards supplied with Matrix products are pre-programmed with the Raspbian image, in this case please go to the “Configuring Raspberry Pi for use with Flowcode” section.
Help can be found at https://www.raspberrypi.org/learning/software-guide/quickstart Creating a Raspberry Pi OS on a micro SDHC card
• Download& install the Raspberry Pi Imager from the Raspberry Pi website
• With the minimum size of 16gig SD card, connected to your PC via an SD and ignore/close any warnings about card not being formatted if they appear
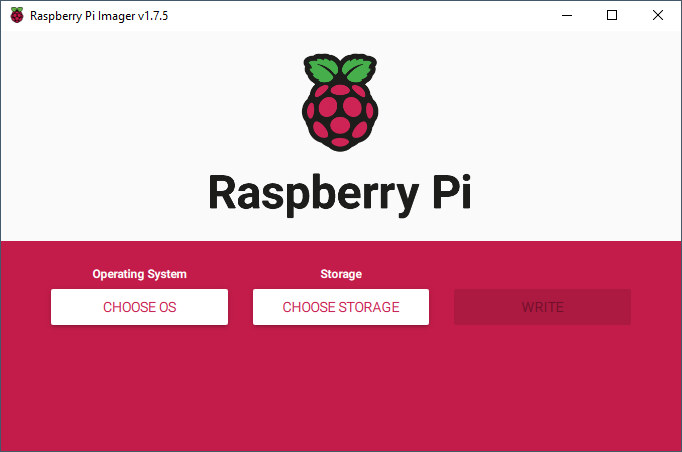
• Run the R Raspberry Pi Imager:
• Left-click CHOOSE OS and select Raspberry Pi OS (32-bit)
• Left-click CHOOSE STORAGE and select the popup.
• With a 16GB SD micro card should look like:
• WRITE should now be available to select
Configuring Raspberry Pi for use with Flowcode
We will use WiFi and set up a Static IP address.
If you have not setup WiFi during the initial setup period, then left-click on the internet icon that is in between the speaker and Bluetooth icons to select your network
After entering the SSID name and password a dynamic IP address will be automatically assigned and the WiFi icon will be solid.
We will set up the WiFi with our own static IP address.
I would recommend running software like WNetWatcher and finding an IP address that's not in use.
For me it is 192.168.0.25.
The 192.168.0 will remain the same, it's the last set that will be different for different devices connected to your network.
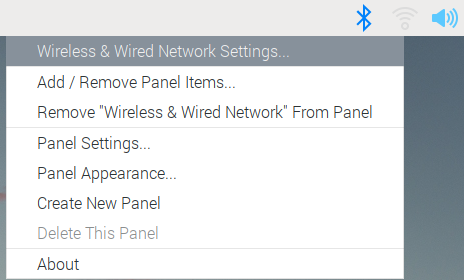
Right-click on the internet icon and select Wireless & Wired Network Settings
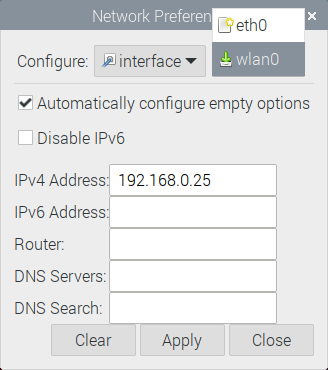
Within Configure: Select wlan0 and enter the new static address withtin IPv4 Address
After applying and closing, then rebooting the Raspberry pi, the signal strength within the WiFi icon will be continuously changing, this is normal.
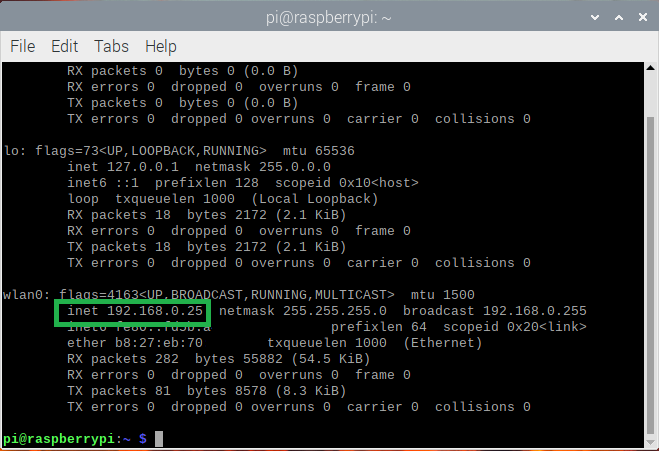
You can check IP is correct from software like WNetWatcher or opening a terminal and enter ifconfig.
Look for wlan0 and for the second line down:
Flowcode uses secure shell, SSH, to transfer user applications to the Raspberry Pi.
SSH is easily enabled on the Raspberry Pi from the desktop.
Alternatively, this can be done by using raspi-config from the terminal.
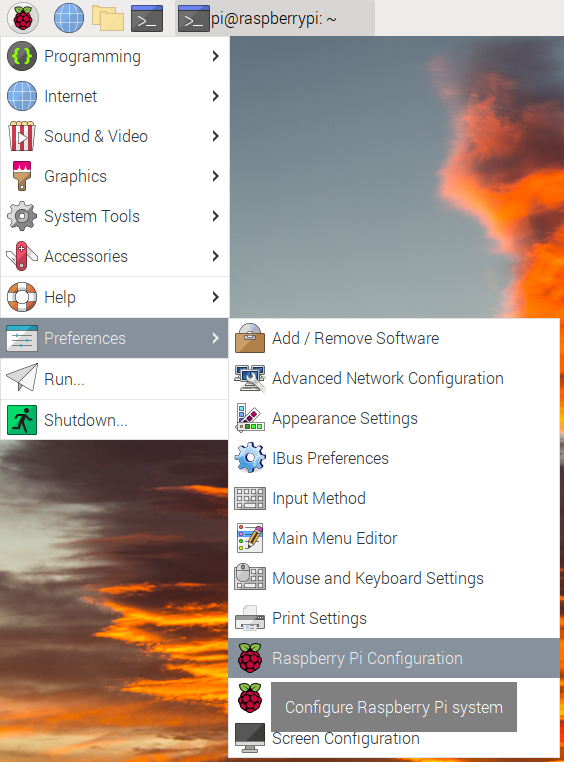
From the Raspberry Pi menu, in the top left corner of the desktop, select “Raspberry Pi Configuration” from the “Preferences” menu.
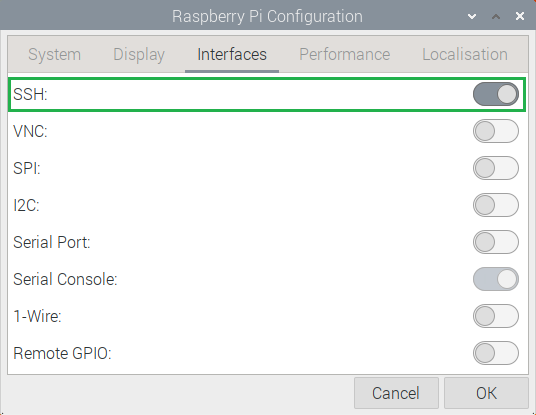
In the “Interfaces” tab, mode the SSH slider to the right for enabled, and click OK.
With SSH remote access enabled, it is recommended that you to consider changing the default pi user password (the initial default is raspberry).
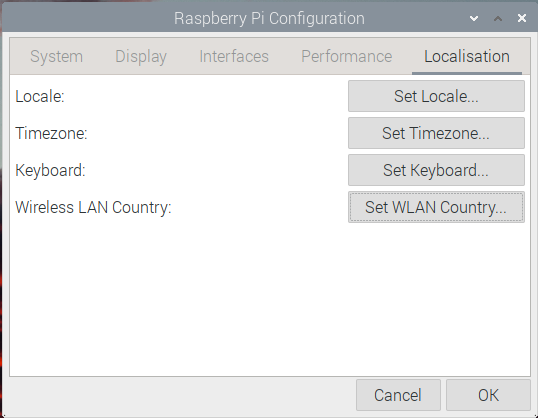
For wireless connections, click and set the “Set WiFi Country” in the “Localisation” tab.
Click the OK button and close the dialog
Creating your first Flowcode 10 Raspberry Pi project
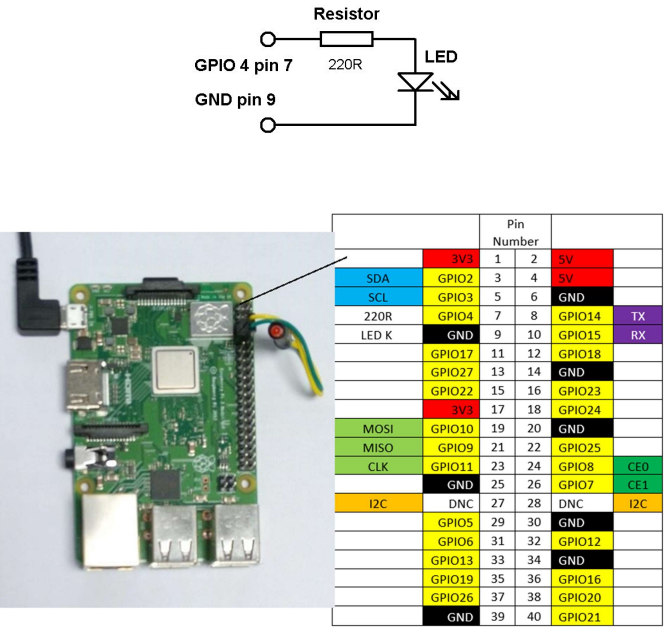
For this example project we will use a Raspberry Pi 3B+ with simply a LED and resistor attached to GPIO 4 to demonstrate digital output.
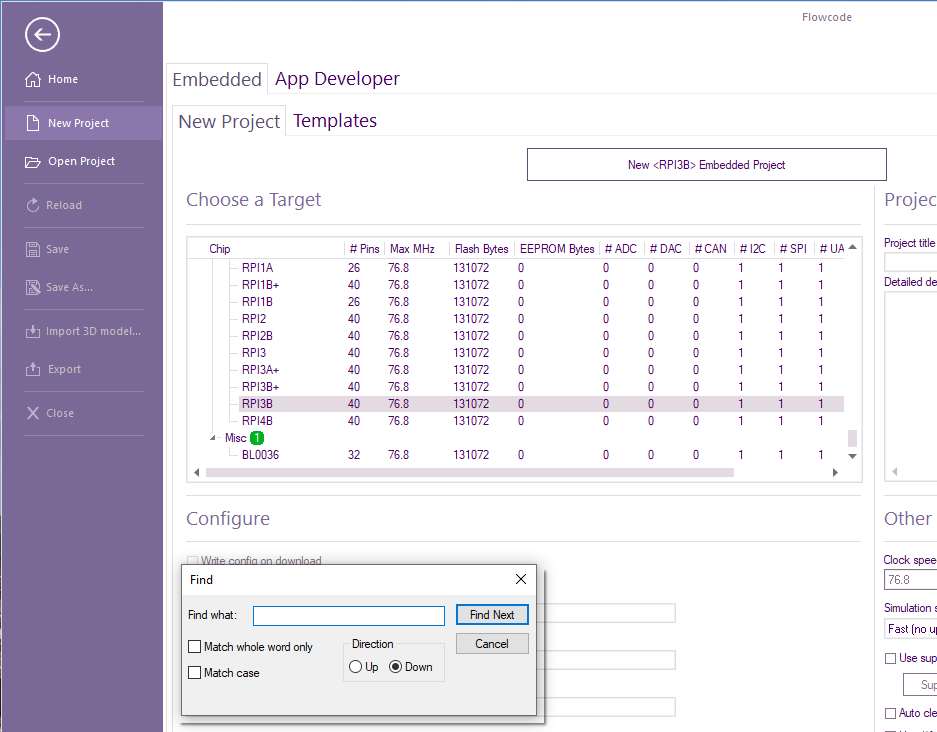
Run Flowcode 10 and select New project.
Under Choose a Target right-select on any target device & select Search.
Within the search box, enter rpi then what version you have e.g rpi3b or rpi3b+ etc.
Press the Enter key or select Find Next.
Select New<RPI3B> Embedded Project:
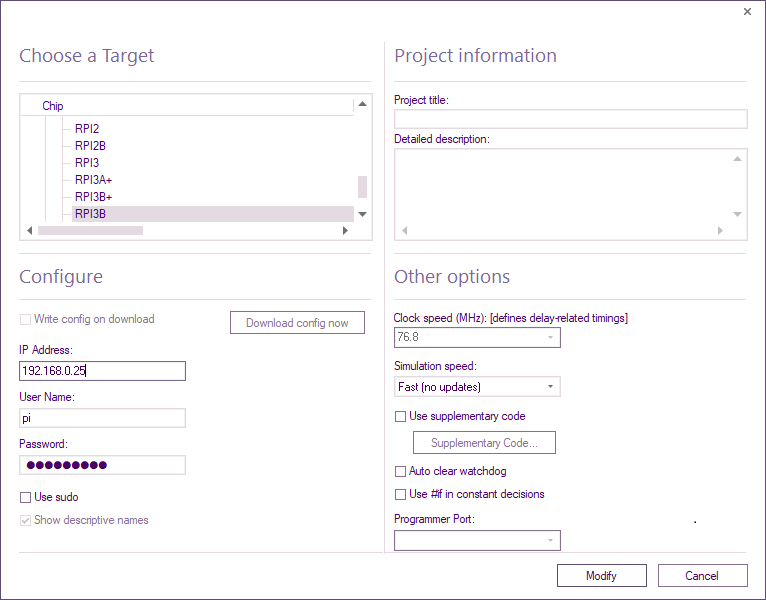
Select Build - ribbon, Project Options
Below Configure, enter the IP address for the Raspberry Pi together with the user name and password (usually pi and raspberry).
Note: The “sudo” checkbox only needs to be enabled if PWM is used in the project.
Select Modify
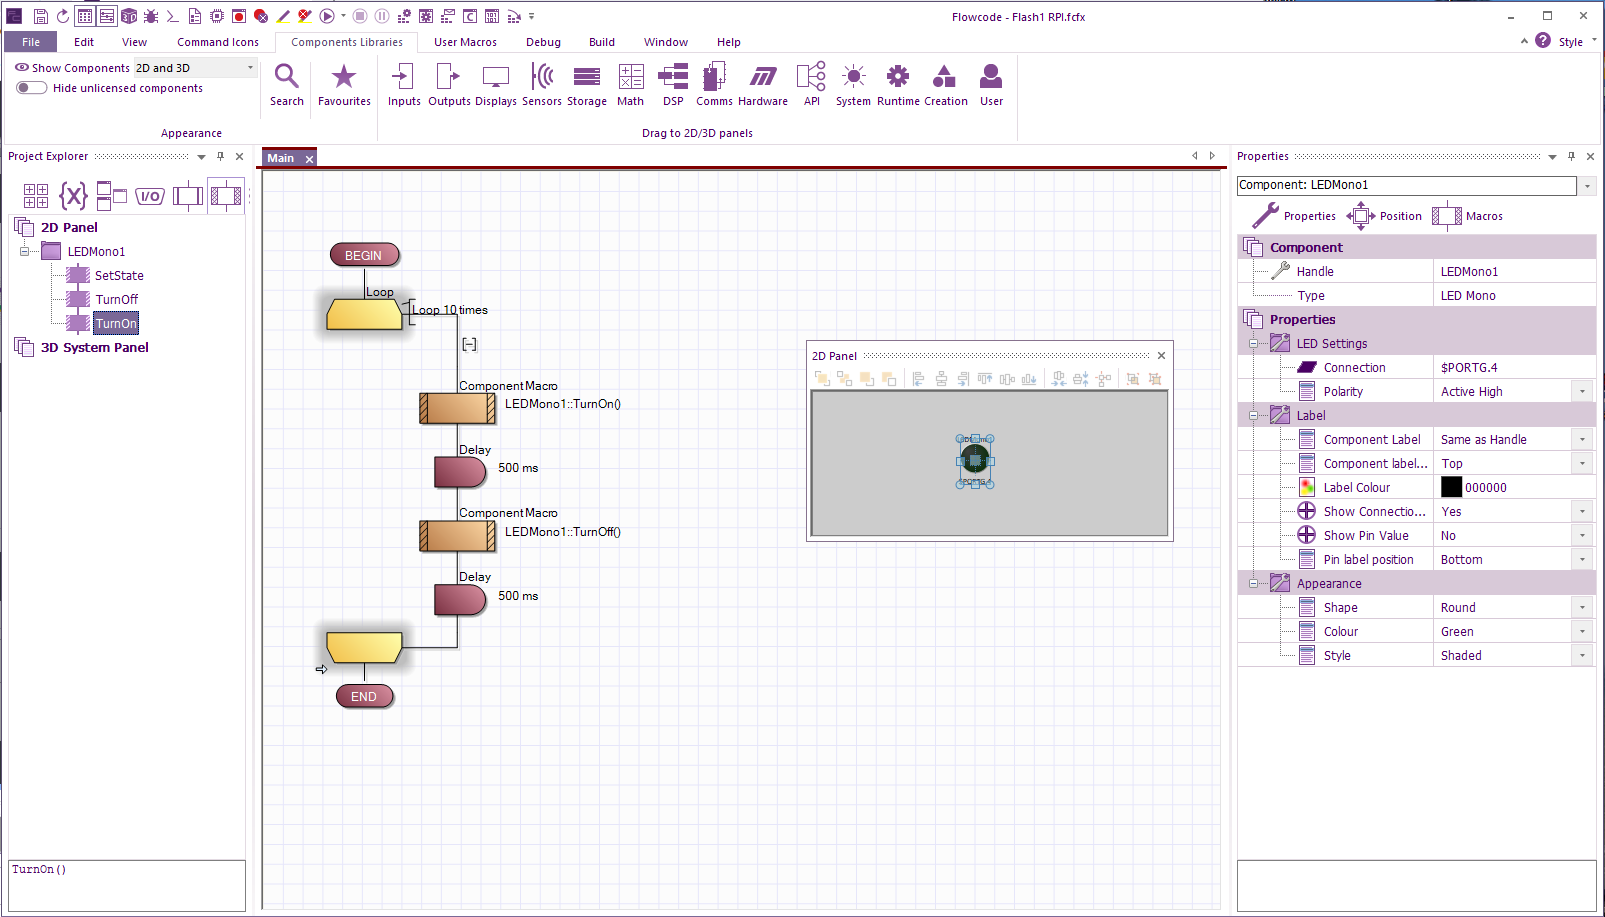
Add a LED component, from the Components Libraries ribbon, Outputs menu, onto the 2D panel.
In the component properties window set the Connection property to PORTG,4 (this represents GPIO 4).
Enable the Project Explorer by selecting it from the View ribbon.
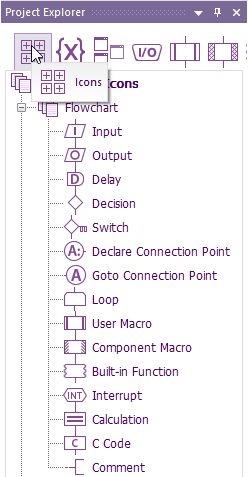
Icons for example Loop, calculation box & Delay etc can be selected by clicking on the Icons icon of the project explorer.
To the main flowchart add a loop of fixed count 10
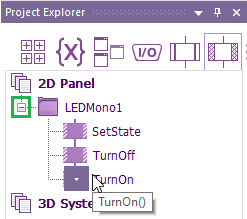
Component icons can be selected by clicking on Component’s icon of the project explorer.
For all the functions of components click on the + on the far left of the components.
Together with component icons to turn on and off the LED with 500mS delays as shown:
Save the project without any spaces (underscores are OK), and the flowchart can be simulated on screen by clicking the Run button.
To run the project on the Raspberry Pi click the Build ribbon, Compile to Target… icon.
The project compilation window will display followed by a console (Putty) window whilst the program runs on the Raspberry Pi and flashes the LED 10 times
Sample Flowcode 10 project for Raspberry Pi and E-blocks
For this example, we will use an E-blocks 2 Raspberry Pi upstream board (BL0036), with Raspberry Pi 3B+ installed, and a Combo board (BL0114).
As with the previous example, Run Flowcode 10 and select New project.
Under Choose a Target right-select on any target device & select Search.
Within the search box, enter BL0036.
Press the Enter key or select Find Next.
Select New< BL0036> Embedded Project
Select Build - ribbon, Project Options.
Below Configure, enter the IP address for the Raspberry Pi together with the user name and
password (usually pi and raspberry).
Note: The “sudo” checkbox only needs to be enabled if PWM is used in the project.
Select Modify
Select Components Libraries ribbon then select Search.
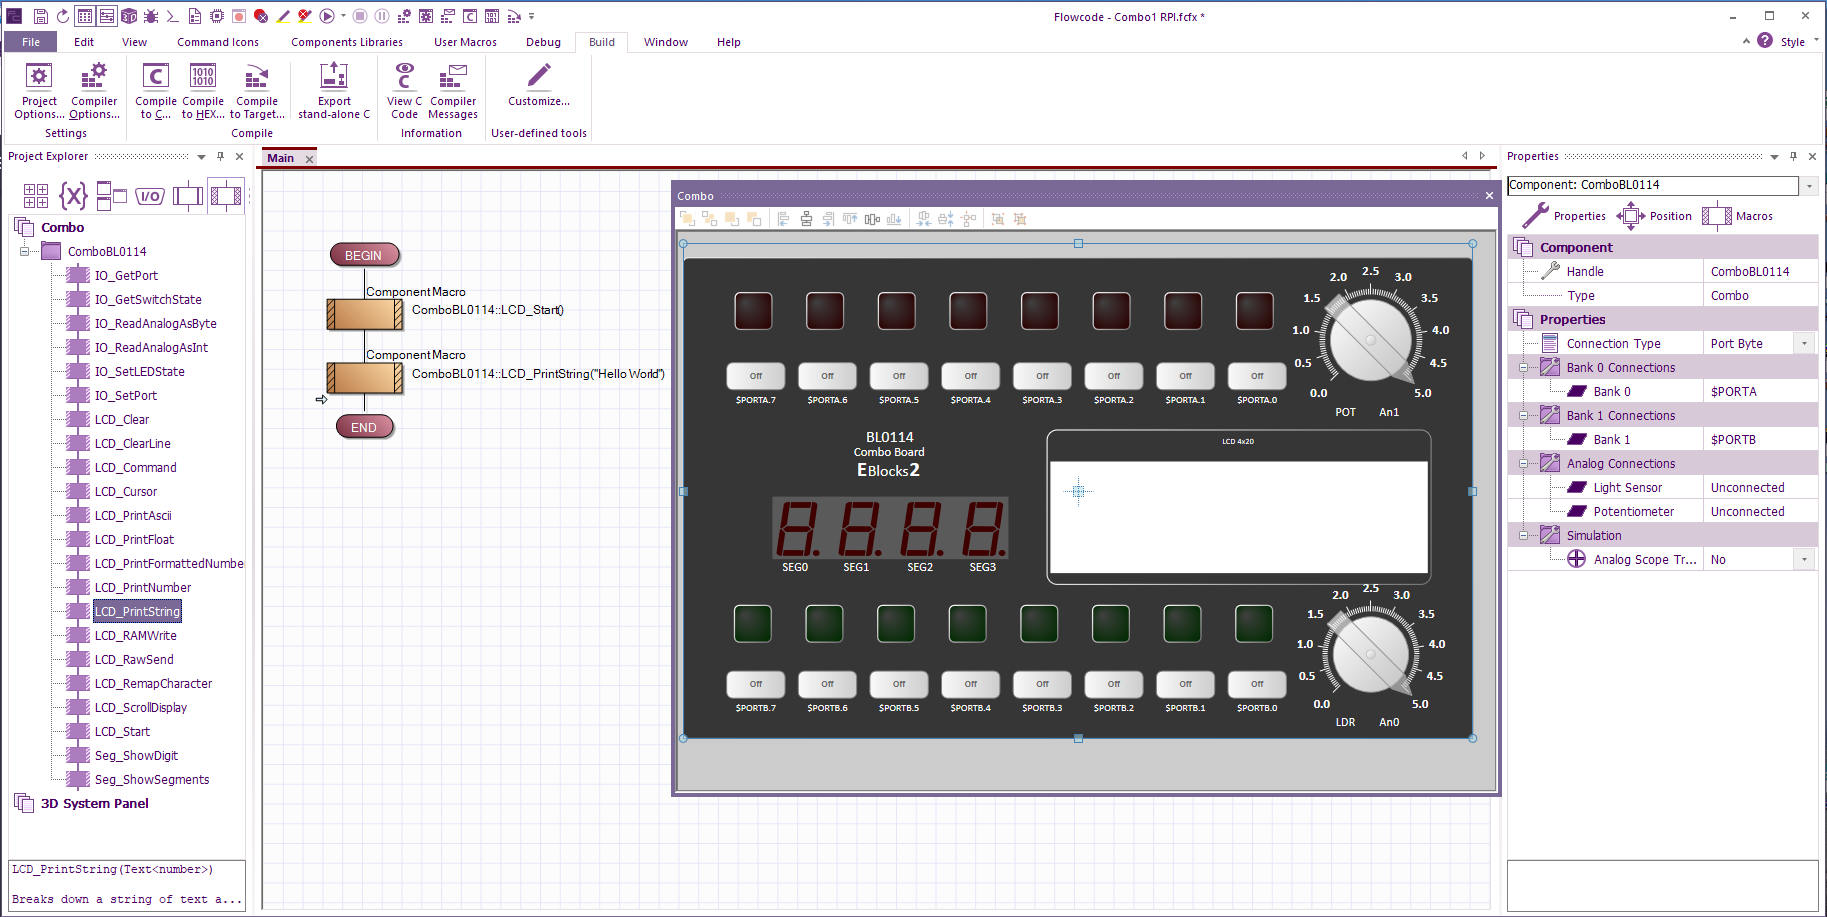
Enter bl0114 & left or right-click, Add to 2D panel Combo BL0114 component will be added onto the dashboard.
From the Project Explorer window drag and drop a Start icon followed by a PrintString icon, set the text field to “Hello World”.
Save the project (no spaces) and click the “Compile to chip” button in the task bar.
The project compilation window will run followed by a console (Putty) window whilst the program runs on the Raspberry Pi target, and “Hello World” should appear on the display.
(Note: Ensure that the BL0114 “LCD” switch is set to ON)
Running programs from the Flowcode IDE
Flowcode uses secure shell to transfer and run user applications, so whilst running you will see the shell console window on the host PC.
Note that in the case of programs with a continuous loop this window will remain continuously present on the host PC.
Pressing CTRL and C in the window will abort the running program on the Raspberry Pi and exit the console window.
The Flowcode DebugPrint component can be used to output text to the console window for debugging or other purposes.
The shell console window runs concurrently with Flowcode such that ICD (In Circuit Debugging) can be done with the use of the Flowcode Ghost features of the Matrix E-blocks 2 Raspberry Pi upstream board or Flowkit v2.
Running your programs independently of Flowcode
Once you have used Flowcode to create, compile and transfer your program to the Raspberry PI, it will exist in the home directory of the selected user e.g. /home/pi
From there the application can be run via a serial console such as Putty or virtual desktop such as VNC or RDP. VNC and SSH for Putty are enabled via the Raspberry Pi “Interface Configuration” dialog.
Your application can also be configured to run from start-up of the Raspberry Pi by adding a line to the /home/pi/.bashrc file, but before the exit 0.
Editing this file must be done with root privileges, e.g. sudo nano /home/pi/.bashrc
/home/pi/MyFlowcodeProject & exit 0
Notes: It is vital that you do not use any spaces within the project name.
If you do, the code will not autorun on start up.
Underscores are allowed.
It is always best to add a space then & after the project name.
If you don’t then the Pi will not complete the boot process.
On older versions of the Raspberry PI OS the startup file was /etc/rc.local and the corresponding command to edit the file, sudo nano /etc/rc.local
Using Raspberry Pi hardware peripherals
Hardware peripherals on the Raspberry Pi are limited to UART, SPI, I2C and PWM.
To use these peripherals with Flowcode they must be first be enabled via the Raspberry Pi “Interface Configuration” dialog.
There is no direct support for analogue or interrupts.
Analogue inputs and outputs would be implemented via external devices.
Also note that (at the date of this document) PWM requires programs to be run with root privileges, for which Flowcode provides the option to run programs as sudo.
Flowcode provides software versions of SPI and I2C such that devices using these protocols can be connected to any free GPIO pins.
Due to the RTOS operation of Raspberry Pi, the bit rate of these can depend upon other running processes.
The same is the case for delays, these can vary, the relative deviation being greater for shorter delays.
