|
Introduction to Microcontroller Programming * Course Index * Introduction * About the Author * About this Course * Feedback * Course Navigation * Quick Course Navigation * How to use this Course * Acronyms Used and Course Conventions About PICmicro Chips * What is a PICmicro? * Microcontrollers * Digital versus Analogue * Inputs and Outputs * Memory * Programming * 16F1937 Architecture Clocking Your PICmicro Devices * Introduction * The Clock Circuit * Clock Settings * Clock Confusion E-Blocks * Introduction to E-blocks * Using E-blocks * E-blocks Boards Flowcode Step By Step * Introduction to Flowcode * Basic Flowcode Functions * Digital Outputs * Digital Inputs * Basic Loops * The LCD Display * Binary Numbers * Decisions * Goto (Connection Point) * 7-Segment Displays * Software Macro * Strings and Memory ## Introduction ## Set up the Equipment ## Exploring the Keypad ## Using String Variables ## ASCII ## Seeing ASCII ## Getting a Phone Number ## You try it ## EEPROM * A Simple Hi-Fi PICmicro Projects * Introduction to PICmicro Projects * Construction Methods * Choosing a Power Source * Adding Inputs * Input Conditioning * Adding Outputs * Adding Drivers Labs * Introduction and Lesson Plan * 1. Output * 2. Delay * 3. Connection Point * 4. Calculations * 5. Loop * 6. Input * 7. Decision * 8. LCD * 9. Keypad * 10. Analogue + EEPROM * 11. Software Macro * 12. External Interrupt * 13. Timer Interrupt |
(:Summary:Contains the 'action' links (like Browse, Edit, History, etc.), placed at the top of the page, see site page actions:) (:comment This page can be somewhat complex to figure out the first time you see it. Its contents are documented at PmWiki.SitePageActions if you need help. :) * Print (:comment (:if group Site,SiteAdmin,Cookbook,Profiles,PmWiki*:) (:comment delete if and ifend to enable backlinks:) * %item rel=nofollow class=backlinks accesskey='$[ak_backlinks]'% [[{*$Name}?action=search&q=link={*$FullName} | $[Backlinks] ]] (:ifend:) :) * Login Using String Variables<^< Exploring the Keypad | Course Index | ASCII >^>(:nl:) Strings are collections of Byte variables. A string can be used to store a sequence of numbers or a sequence of letters. When you declare a string of a certain length, you actually declare an array of Byte variables where the number of bytes corresponds to the string length. Every character of the string you declare is stored as a 8 bit value in a separate byte in the RAM memory. For example: if you declare this: text[4], then the text in the string variable 'text' can be 4 characters long. In fact this string variable could be used to store the word 'JOHN' in. If you don't declare a size next to the name of your string variable, Flowcode will set it to the default size of 20. Beware of the maximum of 512 8-bit variables that can be stored in the PIC16F1937. Arrays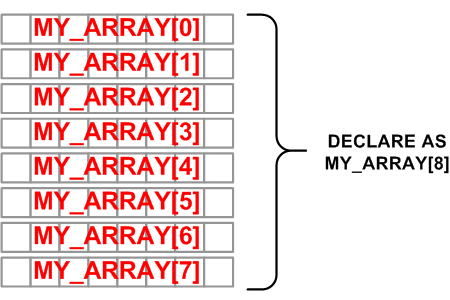 You may have come across Array variables before. In Flowcode Strings and Arrays are equivalent. Arrays are 2 or more variables with the same name and a different 'member number' between square braces. e.g. if you declare a string as: MY_ARRAY[8], then 8 different 8-bit variables are declared at once. They can all be addressed separately by adding the correct member number between square braces: in this case MY_ARRAY[0] to MY_ARRAY[7]. Strings / Arrays are used in cases where a number of similar variables are needed. (:nl:)(:table style="clear:both":)
| |
(:Summary: Website page footer:)
Print - (:comment (:if group Site,SiteAdmin,Cookbook,Profiles,PmWiki*:) (:comment delete if and ifend to enable backlinks:) %item rel=nofollow class=backlinks accesskey='$[ak_backlinks]'% [[{*$Name}?action=search&q=link={*$FullName} | $[Backlinks] ]] (:ifend:) :) Search - Login
Page last modified on April 30, 2013, at 01:54 PM