|
Introduction to Microcontroller Programming * Course Index * Introduction * About the Author * About this Course * Feedback * Course Navigation * Quick Course Navigation * How to use this Course * Acronyms Used and Course Conventions About PICmicro Chips * What is a PICmicro? * Microcontrollers * Digital versus Analogue * Inputs and Outputs * Memory * Programming * 16F1937 Architecture Clocking Your PICmicro Devices * Introduction * The Clock Circuit * Clock Settings * Clock Confusion E-Blocks * Introduction to E-blocks * Using E-blocks * E-blocks Boards Flowcode Step By Step * Introduction to Flowcode * Basic Flowcode Functions * Digital Outputs * Digital Inputs * Basic Loops * The LCD Display * Binary Numbers * Decisions * Goto (Connection Point) * 7-Segment Displays * Software Macro * Strings and Memory * A Simple Hi-Fi PICmicro Projects * Introduction to PICmicro Projects * Construction Methods * Choosing a Power Source * Adding Inputs ## Switches ## Switch Unit ## Sensors ## Sensing Units * Input Conditioning * Adding Outputs * Adding Drivers Labs * Introduction and Lesson Plan * 1. Output * 2. Delay * 3. Connection Point * 4. Calculations * 5. Loop * 6. Input * 7. Decision * 8. LCD * 9. Keypad * 10. Analogue + EEPROM * 11. Software Macro * 12. External Interrupt * 13. Timer Interrupt |
(:Summary:Contains the 'action' links (like Browse, Edit, History, etc.), placed at the top of the page, see site page actions:) (:comment This page can be somewhat complex to figure out the first time you see it. Its contents are documented at PmWiki.SitePageActions if you need help. :) * Print (:comment (:if group Site,SiteAdmin,Cookbook,Profiles,PmWiki*:) (:comment delete if and ifend to enable backlinks:) * %item rel=nofollow class=backlinks accesskey='$[ak_backlinks]'% [[{*$Name}?action=search&q=link={*$FullName} | $[Backlinks] ]] (:ifend:) :) * Login Switch Unit<^< Switches | Course Index | Sensors >^>(:nl:) The sensors just described change their resistance when changes take place in external conditions such as temperature or light level. They are analogue devices. Their resistance copies the external condition. Switches also change their resistance, when switched on and off. A switch should have a huge resistance when switched off. That is why no current flows. It should have a tiny resistance when switched on, so as not to affect the current flowing. There are only two states, on and off. The resistance of the switch has only two values, huge and tiny. These are digital devices. Like the analogue sensors, they are usually connected in a voltage divider circuit to convert their resistance change into a voltage change. The same rule applies as in the voltage dividers for the sensing units just described - the bigger resistor gets the bigger share of the power supply voltage. In the switch unit circuits that follow, the huge resistance of the switch, when switched off, absolutely drowns the resistance of the resistor. The switch takes all of the supply voltage, and the resistor takes none. When switched on, the resistance of the resistor drowns the tiny resistance of the switch. Now the resistor takes all of the supply voltage and the switch takes none. 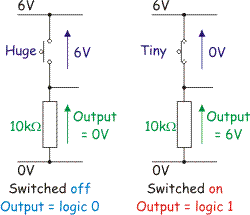 In the first example, this switch unit outputs a low voltage ('logic 0') when the push switch, shown connected to a 10k ohm resistor, is not pressed. When pressed, the switch unit outputs a high voltage ('logic 1'). In the next example, the switch unit is turned upside down, and so is the resulting behaviour! 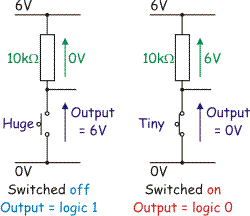 This circuit outputs logic 1 when the switch is not pressed and logic 0 when pressed. (:nl:)(:table style="clear:both":)
| |
(:Summary: Website page footer:)
Print - (:comment (:if group Site,SiteAdmin,Cookbook,Profiles,PmWiki*:) (:comment delete if and ifend to enable backlinks:) %item rel=nofollow class=backlinks accesskey='$[ak_backlinks]'% [[{*$Name}?action=search&q=link={*$FullName} | $[Backlinks] ]] (:ifend:) :) Search - Login
Page last modified on January 30, 2012, at 03:17 PM