|
Introduction to Microcontroller Programming * Course Index * Introduction * About the Author * About this Course * Feedback * Course Navigation * Quick Course Navigation * How to use this Course * Acronyms Used and Course Conventions About PICmicro Chips * What is a PICmicro? * Microcontrollers * Digital versus Analogue * Inputs and Outputs * Memory * Programming * 16F1937 Architecture Clocking Your PICmicro Devices * Introduction * The Clock Circuit * Clock Settings * Clock Confusion E-Blocks * Introduction to E-blocks * Using E-blocks ## About E-blocks ## E-blocks Projects ## How E-blocks Connect to Each Other ## Physical Properties of E-blocks ## Using a Backplane ## Protecting E-blocks Circuitry ## Using Covers ## Adding Power to E-blocks ## Understanding the Patch System ## Sharing a Port ## Using ZIF Sockets * E-blocks Boards Flowcode Step By Step * Introduction to Flowcode * Basic Flowcode Functions * Digital Outputs * Digital Inputs * Basic Loops * The LCD Display * Binary Numbers * Decisions * Goto (Connection Point) * 7-Segment Displays * Software Macro * Strings and Memory * A Simple Hi-Fi PICmicro Projects * Introduction to PICmicro Projects * Construction Methods * Choosing a Power Source * Adding Inputs * Input Conditioning * Adding Outputs * Adding Drivers Labs * Introduction and Lesson Plan * 1. Output * 2. Delay * 3. Connection Point * 4. Calculations * 5. Loop * 6. Input * 7. Decision * 8. LCD * 9. Keypad * 10. Analogue + EEPROM * 11. Software Macro * 12. External Interrupt * 13. Timer Interrupt |
(:Summary:Contains the 'action' links (like Browse, Edit, History, etc.), placed at the top of the page, see site page actions:) (:comment This page can be somewhat complex to figure out the first time you see it. Its contents are documented at PmWiki.SitePageActions if you need help. :) * Print (:comment (:if group Site,SiteAdmin,Cookbook,Profiles,PmWiki*:) (:comment delete if and ifend to enable backlinks:) * %item rel=nofollow class=backlinks accesskey='$[ak_backlinks]'% [[{*$Name}?action=search&q=link={*$FullName} | $[Backlinks] ]] (:ifend:) :) * Login E-blocks Projects<^< About E-blocks | Course Index | How E-blocks Connect to Each Other >^>(:nl:) Upstream and downstream boards can be snapped together to form a complete electronic system like this fully working mobile phone: 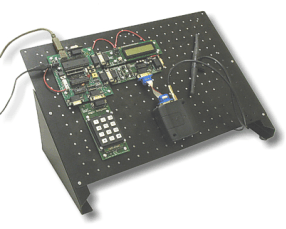 E-blocks are compatible with a wide range of sensors and accessories which allows you to build a very wide variety of systems. Here are some other examples: 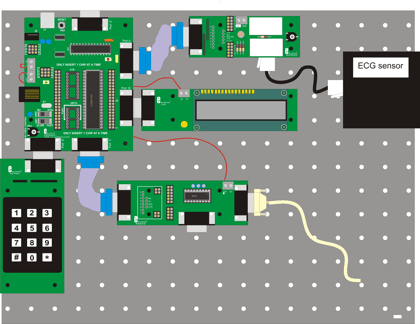 This graphic shows an ElectroCardioGram (ECG) system that can be used to show heart rate waveforms on a PC. The system consists of: a PICmicro Multiprogrammer, a sensor board with ECG sensor fitted, an LCD display, a keypad, and an RS232 board that facilitates a connection to the PC. 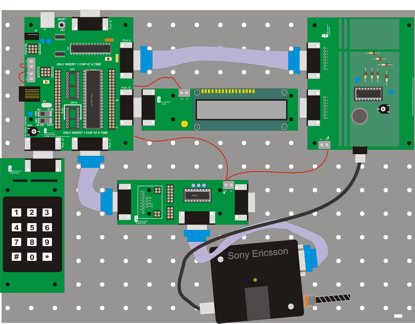 This is an electronic bug using mobile phone technology. A small patch board contains a microphone and amplifier that feeds into a Sony GSM module with SIM card. A PICmicro Multiprogrammer is used to detect an incoming call and then channel local sound to the incoming caller who can then hear what is going on in the room. Keypad and LCD allow various set ups with dial out at pre-determined times. (:nl:)(:table style="clear:both":)
| |
(:Summary: Website page footer:)
Print - (:comment (:if group Site,SiteAdmin,Cookbook,Profiles,PmWiki*:) (:comment delete if and ifend to enable backlinks:) %item rel=nofollow class=backlinks accesskey='$[ak_backlinks]'% [[{*$Name}?action=search&q=link={*$FullName} | $[Backlinks] ]] (:ifend:) :) Search - Login
Page last modified on February 03, 2012, at 11:10 AM