|
Introduction to Microcontroller Programming * Course Index * Introduction * About the Author * About this Course * Feedback * Course Navigation * Quick Course Navigation * How to use this Course * Acronyms Used and Course Conventions About PICmicro Chips * What is a PICmicro? * Microcontrollers * Digital versus Analogue * Inputs and Outputs * Memory * Programming * 16F1937 Architecture Clocking Your PICmicro Devices * Introduction * The Clock Circuit * Clock Settings * Clock Confusion E-Blocks * Introduction to E-blocks * Using E-blocks * E-blocks Boards Flowcode Step By Step * Introduction to Flowcode * Basic Flowcode Functions * Digital Outputs ## Set up the Equipment ## Set up the Flowchart ## Adding LED's ## High Speed Simulation ## Slowing it Down ## New Output ## Binary Numbers ## Converting Numbers ## Outputting Numbers ## A Short Test ## Working in Hex ## Downloading the Program * Digital Inputs * Basic Loops * The LCD Display * Binary Numbers * Decisions * Goto (Connection Point) * 7-Segment Displays * Software Macro * Strings and Memory * A Simple Hi-Fi PICmicro Projects * Introduction to PICmicro Projects * Construction Methods * Choosing a Power Source * Adding Inputs * Input Conditioning * Adding Outputs * Adding Drivers Labs * Introduction and Lesson Plan * 1. Output * 2. Delay * 3. Connection Point * 4. Calculations * 5. Loop * 6. Input * 7. Decision * 8. LCD * 9. Keypad * 10. Analogue + EEPROM * 11. Software Macro * 12. External Interrupt * 13. Timer Interrupt |
(:Summary:Contains the 'action' links (like Browse, Edit, History, etc.), placed at the top of the page, see site page actions:) (:comment This page can be somewhat complex to figure out the first time you see it. Its contents are documented at PmWiki.SitePageActions if you need help. :) * Print (:comment (:if group Site,SiteAdmin,Cookbook,Profiles,PmWiki*:) (:comment delete if and ifend to enable backlinks:) * %item rel=nofollow class=backlinks accesskey='$[ak_backlinks]'% [[{*$Name}?action=search&q=link={*$FullName} | $[Backlinks] ]] (:ifend:) :) * Login Working in Hex<^< A Short Test | Course Index | Downloading the Program >^>(:nl:) If you are working through this as an experienced programmer you will now have a question: "I wonder if Flowcode supports Hexadecimal numbers?" If you are already feeling overwhelmed then skip this section and come back to it later. The answer is yes. Hexadecimal, 'Hex' for short, is a more convenient form (for humans) of representing numbers than binary. A binary digit in a number varies between 0 and 1. A decimal digit varies between 0 and 10. A hex digit has 16 possible states. Clearly this is a problem as we have only the digits 0 to 9. To get round this we use the letters A to F to represent the additional 6 digits required. The following table shows the equivalent numbers in decimal, binary and hex:
Note that we have shown the binary number with 8 digits. This is a handy convention as computers - and our PICmicro chips - store information in groups of 8 bits. A single memory cell inside a PICmicro device varies between 00000000 and 11111111. In decimal this range is 0 to 255. The equivalent in Hex is 0 to FF. Hex in FlowcodeYou can put Hex in Flowcode by preceeding it by the letters '0x' in any of the dialogue boxes. For example: 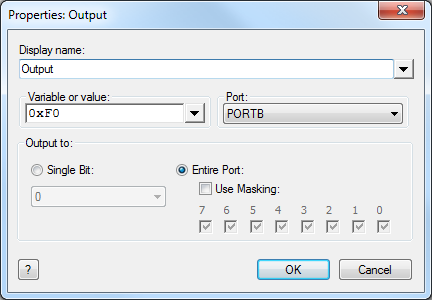 This is the equivalent to placing the number 11110000 onto port B. In other words it will place a logic 1 (normally 5 volts) onto the top 4 output pins, and a logic 0 (0 volts) onto the bottom 4 pins. (:nl:)(:table style="clear:both":)
| |
(:Summary: Website page footer:)
Print - (:comment (:if group Site,SiteAdmin,Cookbook,Profiles,PmWiki*:) (:comment delete if and ifend to enable backlinks:) %item rel=nofollow class=backlinks accesskey='$[ak_backlinks]'% [[{*$Name}?action=search&q=link={*$FullName} | $[Backlinks] ]] (:ifend:) :) Search - Login
Page last modified on May 07, 2013, at 07:54 AM