|
Introduction to Microcontroller Programming * Course Index * Introduction * About the Author * About this Course * Feedback * Course Navigation * Quick Course Navigation * How to use this Course * Acronyms Used and Course Conventions About PICmicro Chips * What is a PICmicro? * Microcontrollers * Digital versus Analogue * Inputs and Outputs * Memory * Programming * 16F1937 Architecture Clocking Your PICmicro Devices * Introduction * The Clock Circuit * Clock Settings * Clock Confusion E-Blocks * Introduction to E-blocks * Using E-blocks * E-blocks Boards ## E-blocks Documentation and Numbering ## Sensor Interface (EB003) ## LED Board (EB004) ## LCD Board (EB005) ## Multiprogrammer (EB006) ## Switch Board (EB007) ## Quad 7-segment Display (EB008) ## Keyboard (EB014) ## Prototype Board (EB016) ## Flowcode Step By Step * Introduction to Flowcode * Basic Flowcode Functions * Digital Outputs * Digital Inputs * Basic Loops * The LCD Display * Binary Numbers * Decisions * Goto (Connection Point) * 7-Segment Displays * Software Macro * Strings and Memory * A Simple Hi-Fi PICmicro Projects * Introduction to PICmicro Projects * Construction Methods * Choosing a Power Source * Adding Inputs * Input Conditioning * Adding Outputs * Adding Drivers Labs * Introduction and Lesson Plan * 1. Output * 2. Delay * 3. Connection Point * 4. Calculations * 5. Loop * 6. Input * 7. Decision * 8. LCD * 9. Keypad * 10. Analogue + EEPROM * 11. Software Macro * 12. External Interrupt * 13. Timer Interrupt |
(:Summary:Contains the 'action' links (like Browse, Edit, History, etc.), placed at the top of the page, see site page actions:) (:comment This page can be somewhat complex to figure out the first time you see it. Its contents are documented at PmWiki.SitePageActions if you need help. :) * Print (:comment (:if group Site,SiteAdmin,Cookbook,Profiles,PmWiki*:) (:comment delete if and ifend to enable backlinks:) * %item rel=nofollow class=backlinks accesskey='$[ak_backlinks]'% [[{*$Name}?action=search&q=link={*$FullName} | $[Backlinks] ]] (:ifend:) :) * Login Patch Board EB017<^< Prototype Board (EB016) | Course Index | Introduction to Flowcode >^>(:nl:) EB017 Patch BoardMore information can be found here. 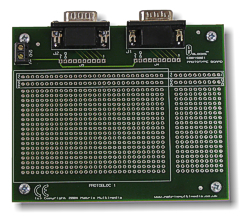 EB017 Patch Board Block Diagram * Click EB017-30-1 for a datasheet. * The male D-type connectors fit into the Female connectors of an upstream board. * This board lets you build and test your own PICmicro circuits. * BE AWARE OF: ** the current limit per PIN of the PICmicro is 25mA. Stay well below this limit! ** Connecting input devices on pins that are configured as outputs (see switch board EB007) ** The total current limit of the PICmicro (all of the pins) is 200mA. * Of you want to test a less permanent circuit, you may prefer the EB016 Prototype Board. An example of how the Patch board is usedThese two photographs show how you can use the Patch board. On the bottom side of the patch board you can use 'wiring pencil wire' to speed up the prototyping process. This thin wire has a layer of polyurethane insulating coating that burns away with a soldering iron to reveal the copper wire beneath. To use it you just apply the soldering iron for a second and then solder it to the appropriate component pin.  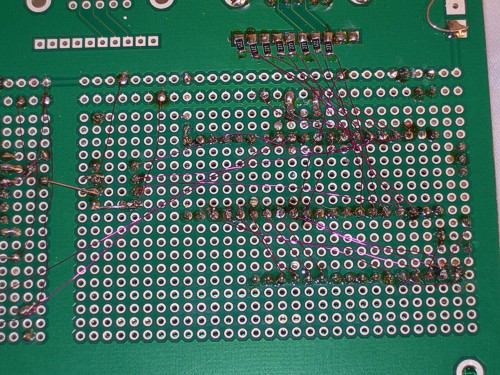 (:nl:)(:table style="clear:both":)
| |
(:Summary: Website page footer:)
Print - (:comment (:if group Site,SiteAdmin,Cookbook,Profiles,PmWiki*:) (:comment delete if and ifend to enable backlinks:) %item rel=nofollow class=backlinks accesskey='$[ak_backlinks]'% [[{*$Name}?action=search&q=link={*$FullName} | $[Backlinks] ]] (:ifend:) :) Search - Login
Page last modified on December 22, 2011, at 09:45 AM